


156 Chapter 12—Common Channel Functions
DM2000 Version 2—Owner’s Manual
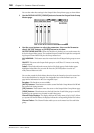
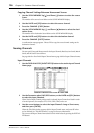
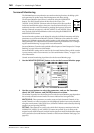
Copying Channel Settings Between Noncurrent Scenes
1 Use the SCENE MEMORY Up [ ] and Down [ ] buttons to select the source
Scene.
The number of the source Scene flashes on the SCENE MEMORY display.
2 Use the LAYER and [SEL] buttons to select the source channel.
3 Press the CHANNEL [COPY] button.
4 Use the SCENE MEMORY Up [ ] and Down [ ] buttons to select the desti-
nation Scene.
The number of the destination Scene flashes on the SCENE MEMORY display.
5 Use the LAYER and [SEL] buttons to select the destination channel.
6 Press the CHANNEL [PASTE] button.
A confirmation message appears. Choose YES to copy the source channel settings to the
destination channel.
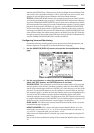
Naming Channels
You can specify Long and Short names for the Input Channels, Bus Outs, Aux Sends, Matrix
Sends, and the Stereo Out as follows.
See page 298 for a list of initial Input Channel names; page 299 for Output Channel names.
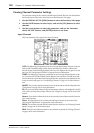
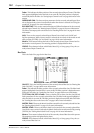
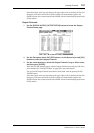
Input Channels
1 Use the DISPLAY ACCESS [INPUT PATCH] button to locate the Input Channel
Name page.
2 Use the Parameter wheel, INC/DEC buttons, or the LAYER and [SEL] buttons
to select the Input Channels.
When Vertical Input Channel pairing mode is selected, Input Channels are listed in order
of vertical partners, for example, CH1, CH25, CH2, CH26, and so on.
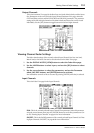
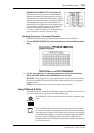
3 Use the cursor buttons to select the Input Channel’s Long or Short name,
and then press [ENTER].
When the Title Edit window appears, edit the Input Channel name, and press OK when
you’ve finished. See “Title Edit Window” on page 54 for more information.
You can reset all Input Channel names back to their initial values by pressing the INITIAL-
IZE button.