


36 Chapter 2—Control Surface & Rear Panel
DM2000 Version 2—Owner’s Manual
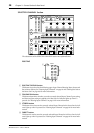
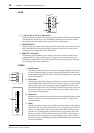
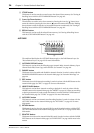
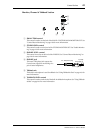
D STORE button
This button is used to store the current Scene to the selected Scene memory. See “Storing &
Recalling Scenes with the SCENE MEMORY Buttons” on page 187.
E Scene Up/Down buttons
These buttons are used to select Scene memories. Pressing the
Scene Up [ ] button incre-
ments the selection; pressing the
Scene Down [ ] button decrements the selection. Holding
down a button causes the selection to increment/decrement continuously. See “Storing &
Recalling Scenes with the SCENE MEMORY Buttons” on page 187.
F RECALL button
This button is used to recall the selected Scene memory. See “Storing & Recalling Scenes
with the SCENE MEMORY Buttons” on page 187.
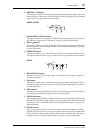
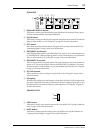
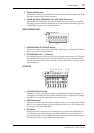
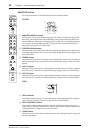
AUTOMIX
The small text labels below the AUTOMIX buttons apply to the DAW Remote Layer. See
“About Remote Layers” on page 253 for more information.
A AUTOMIX DISPLAY button
This button is used to select the following pages: Automix Main, Automix Memory, Input
Channel Fader Edit, Event Copy, and Event Edit. See “Automix” on page 193.
B ENABLE button
This button is used to enable and disable the Automix function. It works in unison with the
ENABLED/DISABLED button on the Automix Main page. See “Automix Main Page” on
page 194.
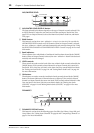
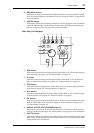
C REC button
This button is used with Automix recording. It works in unison with the REC button on the
Automix Main page. See “REC” on page 197 for more information.
D ABORT/UNDO button
This button is used to abort Automix recording or playback. It works in unison with the
ABORT button on the Automix Main page. See “ABORT” on page 197. When not recording
or playing an Automix, it’s used to undo the Automix, in unison with the UNDO button on
the Automix Main page. See “UNDO” on page 197 for more information.
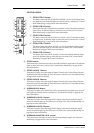
E AUTO-REC button
This button is used to arm Automix Auto Recording function. It works in unison with the
AUTO REC button on the Automix Main page. See “AUTO REC” on page 197 for more
information.
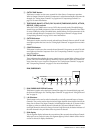
F RETURN button
This button is used to select the Automix Edit Out mode. It works in unison with the EDIT
OUT RETURN buttons on the Automix Main page. See “EDIT OUT” on page 195 for more
information.
G RELATIVE button
This button is used to set the Automix Fader Edit mode. It works in unison with the FADER
EDIT buttons on the Automix Main page. See “FADER EDIT” on page 196 for more infor-
mation.
OVERWRITE
FADER ON
PAN
EQAUX AUX
ON
ENABLE
REC ABORT/
UNDO
AUTO-
REC
RETURN
RELATIVE
TOUCH
SENSE
DISPLAY
SUSPEND WRITE TOUCH LATCH READ TRIM OFF
SURROUND
1
9
2 3 4 5 6 7 8
AUTOMIX