


62 Chapter 5 Mixing Stereo and Surround Projects
Working in the Soundtrack Pro Mixer
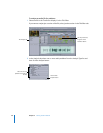
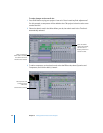
In the Soundtrack Pro Mixer tab, you can easily compare and adjust volume for each
track, bus, and submix. If you’d rather work with a floating Mixer window, you can drag
the Mixer tab off to display a separate Mixer window. You may want to do this when
you want to make fine adjustments to a track’s volume. You can then manually stretch
the Mixer window to the length of the Soundtrack Pro window.
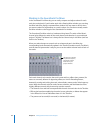
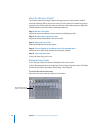
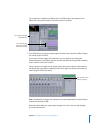
The Soundtrack Pro Mixer mimics a hardware mixing board. The order of the Mixer’s
channel strips follows the order of the tracks, busses, and submixes in your multitrack
project’s Timeline. The Master bus is always the last channel strip in the Mixer (and last
track in the Timeline).
When you make changes to controls such as volume and pan in the Mixer, the
corresponding levels automatically update in the Timeline’s header controls. The Mixer’s
vertical channel layout makes it easy for you to see the relative volume levels of each of
the tracks.
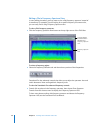
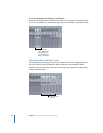
Each track channel strip contains the track’s name and icon, effects slots, panners (for
stereo or surround), buttons for bypassing effects, an Arm for Recording button,
buttons for muting and soloing the track, volume faders, meters, and a Submix pop-up
menu. While the channel strips for tracks, busses, submixes, and the Master bus have
slightly different controls, they share many common controls.
 The channel’s icon and color correspond with the track icon and color in the Timeline.
 Effects that have been applied to the tracks, busses, submixes, or Master bus appear
in the Effects list. You can add effects here or in the Timeline.
 The panner can be round (for surround) or horizontal (for stereo).
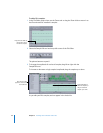
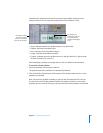
The Mixer has a channel
strip for each track, bus,
and submix, and the
Master bus in your
project’s Timeline.