


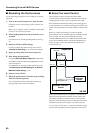
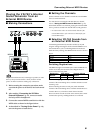


84
Installing the Wave Expansion Board
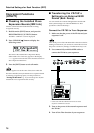
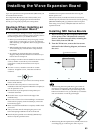
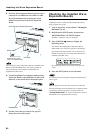
3. Insert the Wave Expansion Board connector into a
connector for an SRX Series slot (SRX A or SRX
B), while simultaneously inserting the board
holders into the holes in the Wave Expansion
Board.
fig.08-04
If the same type of Wave Expansion Board is installed in the
SRX A slot and the SRX B slot, it will only be possible to
select data from the Wave Expansion Board that was
installed in the SRX A slot.
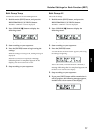
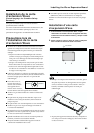
4. Use the Installation Tool supplied with the Wave
Expansion Board to turn the holders in the LOCK
direction, so the board will be fastened in place.
fig.08-05
5. Use the screws that you removed in step 2 to
fasten the cover back in place.
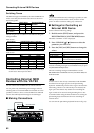
Checking the Installed Wave
Expansion Boards
After installation of the Wave Expansion Boards has been
completed, check to confirm that the installed boards are
being recognized correctly.
1. Turn on the power, as described in “Turning On
the Power” (p. 19).
2. Hold down the [EDIT] button, and press the
REGISTRATION [7] (UTILITY) button.
The Edit’s “UTILITY” screen is displayed.
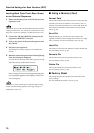
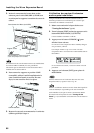
3. Press CURSOR [ ] button to display the
following screen.
The name of the installed Wave Expansion Board,
abbreviated to five characters, appears in the display.
The example here depicts what you would see if the
SRX-02 “Concert Piano” Wave Expansion Board were
installed in the SRX A slot.
fig.06-02(SRXInfo)
By releasing the button, you go back to the previous
screen.
4. Press the [EXIT] button to exit edit mode.
For instructions on selecting Wave Expansion Board Tones,
refer to p. 46.
If “-----” appears next to the name of the slot in which the
board was installed, it may be that the wave expansion board
is not being recognized properly. Use the procedure in
“Turning Off the Power” (p. 19) to turn the power off, then
reinstall the wave expansion board correctly.
Wave Expansion Board (SRX series)
Connector
Board holder
Position them as shown
before you install the board.
LOCK
Installation tool