


Parameter Settings
TENORI-ON Manual 90
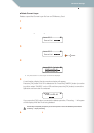
Setting Parameters with the Jog Dial ■ File Menu
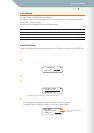
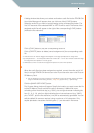
2 Launch the TENORI-ON User Voice Manager software.
Use the TENORI-ON User Voice Manager software included on the supplied CD-
ROM to convert your files to the TENORI-ON format and assign them to the
appropriate LED buttons.
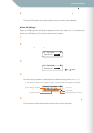
2-1 Install the TENORI-ON User Voice Manager on your computer following the
procedure outlined in the separate "TENORI-ON User Voice Manager
Installation Guide" document.
2-2 Double click the "TNR_UserVoiceMgr.exe" or "TNR_UserVoiceMgr.app" file on
your computer to launch the software.
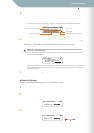
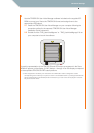
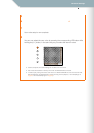
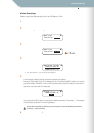
A graphic representation of the TENORI-ON and LED button arrangement in the Score
Mode will appear on the display. [LOAD] buttons 1 through 16 on the display correspond
to the equivalent TENORI-ON LED button positions.
● When shipped from the factory the vertical-axis of the LED button matrix is assigned to a scale
corresponding to the white keys on a piano, as show in the illustration below. If you assign audio files with
pitches corresponding to the default pitches of the buttons, your user voice can be played in the same
way as the internal voices.
EXIT
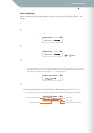
16
mysound04
15
mysound03
14
mysound02
13
mysound01
12
special_effect_E
11
special_effect_D
10
special_effect_C
09
special_effect_B
08
special_effect_A
07
voice01_B2
06
voice01_A2
05
voice01_G2
04
voice01_F2
03
voice01_E2
02
voice01_D2
01
voice01_C2