


E-16
Preparation
Attaching/Removing the “Measuring Base”
A “Measuring Base” has been included with the Spectrophotometer CM-2600d/2500d.
This allows small specimens to be attached securely to the instrument when they are being measured, and
this enables more accurate measurements to be made.
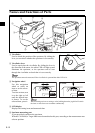
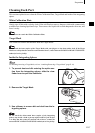
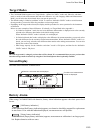
Measuring Base
“Measuring Base”
attachment hole
The “Measuring Base” is shown in the illustration to the right,
and is attached to the base of the CM-2600d/2500d with two
screws.
Note
• Make sure that the “Measuring Base” is securely attached to the
instrument before calibrating the instrument or taking measure
-
ments.
• You must remove the “Measuring Base” before using the optional
Zero Calibration Box or Dust Cover Set.
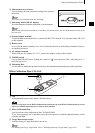
Specifications for “Measuring Base” attachment screws
Thickness of screw head
(head height): less than 3 mm
Length of screw body
(body length): 4- 5 mm
Screw diameter: φ3 mm
Diameter of screw head (head diameter): φ5-6.5 mm
Terms in parenthesis () are JIS defined terms for parts of screws
• When removing the “Measuring Base”, make sure that the screws
used to attach the base to the instrument are stored properly and
are not mislaid.
If the screws do become mislaid, replace them with screws that
meet the specifications shown to the right.
[Screw name]
Cross-Recessed Pan Head Machine Screw M3, Nominal Length 4-5 mm
Attaching/Removing the “Measuring Base” to/from the Instrument
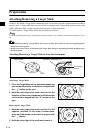
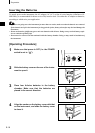
Removing the “Measuring Base”
1. Place the CM-2600d/2500d so that its base is fac-
ing up and it is stable.
2. Using a crosshead screwdriver, turn the two attach-
ment screws counter-clockwise and remove them.
Use a crosshead screwdriver that is a suitable size for the screws.
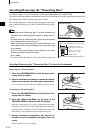
Attaching the “Measuring Base”
1. Place the CM-2600d/2500d so that its base is fac-
ing up and it is stable.
2. Place the “Measuring Base” on the base of the
CM-2600d/2500d as shown in the illustration.
Place the “Measuring Base” so that it is aligned with the attach-
ment holes in the base of the CM-2600d/2500d. When placing the
“Measuring Base” on the base of the CM-2600d/2500d, make sure
that nothing is trapped between the instrument and the base.
3. Using a crosshead screwdriver, turn the two at-
tachment screws clockwise and tighten them se-
curely.
Do not tighten the screws too tightly.