


E-50
4
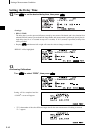
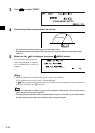
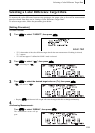
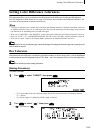
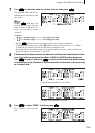
Place the specimen measuring port to the specimen.
5
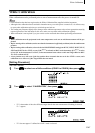
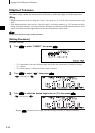
Make sure that is displayed, then press C (MEAS. button).
The lamp will flash, measurement
will be taken, then the result will ap
-
pear on the LCD.
M
emo
• The navigation wheel and MEAS. button cannot be used for three seconds after the MEAS. button is
pressed, if “UV100%” has been set for “UV SETTING”, or for four seconds if “UV0%” or “ADJUSTED”
has been set.
• If does not appear due to the auto power save function, this may be due the fact that it can take time
to start measurement after C is pressed.
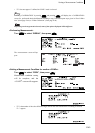
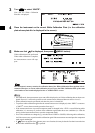
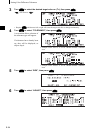
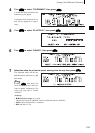
6
Turn B to select “BREAK” or “PREV”, then press A.
To set the next target color, repeat
steps 2 to 5.
To exit target color setting, select
“PREV”.
M
emo
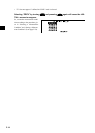
• If a target color has already been set for the selected target color no., a message asking you whether you
wish to overwrite the target color data will appear. Select “YES” to overwrite (or select “NO” if not) using
B, then press A.
• If “MUNSELL”, “DENSITY (A)” or “DENSITY (T)” has been selected as the color space, it will be pos-
sible to set target colors, but no color difference data will be displayed in the measurement screen. In ad-
dition, it is not possible to set color difference tolerances.
• If “COLOR GRAPH” has been selected as the display mode, it will be possible to set target colors, but
color difference cannot be displayed in the measurement screen.
• Measurement will no longer be possible once the total number of target color data and measured data
reaches 1700 (700 in the “defined in COND.” mode). In this case, delete some target color data or meas
-
ured data.
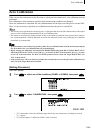
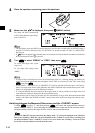
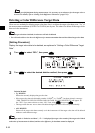
Switching between the Measured Data screen and the <TARGET> screen
Turning B to select “T” and then pressing A will cause the measured data screen to
change to the <TARGET> screen showing the color difference target data for the currently select
-
ed target number which is the target will be used for the next measurement.
Note
If “SPECT. GRAPH” has been selected as the display mode, “T” will not be displayed in the Measured
Data screen. Similarly, “BREAK” will not be displayed in the <TARGET> screen. Thus, switching from
the Measured Data screen to <TARGET> screen or vice versa, back to the <COND
*
> screen once, must
be carried out by the method to select the desired screen.