


Owner’s Manual
Voice mode Voice Editing
26
Quick Guide
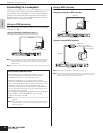
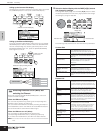
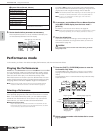
Calling up the Common Edit display
Simultaneously hold down hold down the [SHIFT] button and press
the [COMMON] button to call up the Common Edit display.
Calling up the Element Edit display
To call up the Element Edit display, make sure to turn the [MUTE/
SEL/ENTER] button LED off, and then select the desired Element
with the corresponding the [1/5/9/13]-[4/8/12/16] buttons. If the
[MUTE/SEL/ENTER] button is lit, press the [MUTE/SEL/ENTER]
button again to turn it off.
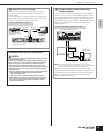
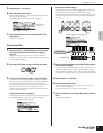
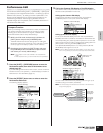
4. Select the desired display with the PAGE [E][F] buttons
and change the settings.
To change the display page, use the PAGE [E][F] buttons. Select
the desired parameter with the cursor [L][M] buttons and change
the settings by using the data dial.
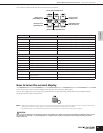
The following briefly describes the main Performance parameters.
Common Edit
Element Edit
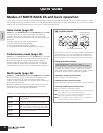
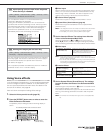
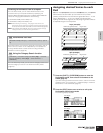
Switching Elements On/Off (Mute) and
selecting the Element
Each time you press the [MUTE/SEL/ENTER] button, the on/off
status of the LED changes.
When the LEDs are lit (Mute)
You can mute any Element by pressing the corresponding Part/
Element button [1/5/9/13] to [4/8/12/16].
You can check which Element is muted by checking the lamps of
the Part/Element buttons. The LEDs of the muted Element buttons
are turned off and the active Element buttons light.
When the LEDs are turn off (Select)
You can select any desired Element by pressing the
corresponding Part/Element button [1/5/9/13] to [4/8/12/16].
If you select the muted Element, the LED of the button flashes.
n You can also switch the on/off status of each Part in the Performance/Multi
mode.
Indicates a Common Edit display
Make sure to turn
this LED off.
Indicates the display for editing Element 1.
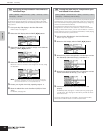
Common Edit
Element Edit 1
Element Edit 2
Element Edit 3
Element Edit 4
TIP
General For setting general parameters, such as Voice
Name, Monophonic/Polyphonic, Tuning,
Portamento, Pitch Bend, Audition phrase, etc.
Output For setting the Voice output parameters, such
as Volume, Pan, Send Level of Reverb/Chorus
Effect, etc.
EG/FLT (Envelope
Generator/Filter)
For setting the time variance parameters such
as Attack, Decay, Release and Sustain, and
Filter parameters such as Cutoff and
Resonance.
CtrlSet (Controller Set) For setting the functions of the external MIDI
controller.
LFO (Low Frequency
Oscillator) (for Normal
Voices)
For setting the LFO parameters. The LFO uses
a low frequency waveform. For more
information about the LFO, see page 57.
LFO USR (User LFO) This display is available only when the “user”
(User LFO wave) is selected in the LFO display
above.
OSC (Oscillator) For setting the various parameters controlling
the waveforms on which the Voice is based. You
can select the Wave used for the Element, the
volume and note range of each Element and so
on.
Pitch For setting the basic pitch parameters for each
Element. Also, by setting the PEG, you can
control how the pitch changes over time.
PEG (Pitch Envelope
Generator)
Filter For changing the tonal characteristics of each
Element, by adjusting overtones included in the
waveform of the Element. You can also set the
FEG for time variance of how the filter works – in
other words, dynamically change the tone and
timbre of the sound over time.
FEG (Filter Envelope
Generator)
AMP (Amplitude) For setting the volume of each Element after the
OSC (Oscillator), PITCH and FILTER
parameters have been applied, as well as the
final overall volume of the signal sent to the
outputs. Also, by setting the AEG, you can
control how the volume changes over time.
AEG (Amplitude Envelope
Generator)
Native (Native Part
Parameters: Plug-in
Voices only)
For setting the Native Parameters. Refer to the
owner's manual of the Plug-in Board.
LFO (Low Frequency
Oscillator)
For setting the LFO parameters for the Normal
Voices.
EQ (Equalizer) For adjusting the tonal qualities of each
Element.
Display name
Parameter name Parameter value