


Owner’s Manual
Performance mode Assigning desired Voices to each Part
32
Quick Guide
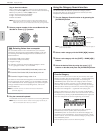
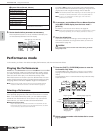
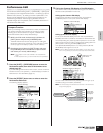
3. Select the Voice display with the PAGE [E][F] buttons.
4. Assign the desired Voice to each Part.
Move the cursor to the desired setting with the cursor [L][M]
buttons. Set the parameters with the data dial.
n Voices of the Multi-part Plug-in Board PLG100-XG cannot be assigned to
Performance Parts.
n You can also assign Voices to a Performance in the Part Edit display
(page 33).
When a Plug-in Board Voice is assigned to a Part, the available
Voice Banks differ depending on the installed Plug-in Board. For
details, refer to the Owner’s Manual of the Plug-in Board.
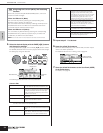
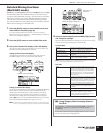
5. Select the Limit display with the PAGE [E][F] buttons,
then set the highest/lowest note of the range
(NoteLimitH/NoteLimitL) and the maximum/minimum
velocity (VelLimitH/VelLimitL) for each Part.
Move the cursor to the desired parameter with the cursor [L][M]
buttons. Set the parameters with the data dial.
6. Name the edited Performance.
Select the General display in the Common Edit, and then input a
name in the Name parameter.
For detailed instructions on naming, refer to page 50.
7. Store the edited Performance to the User Bank (USER)
of the Performance.
For details, see page 49.
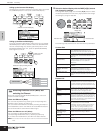
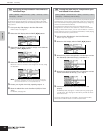
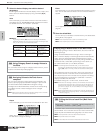
Part Switch (PartSw) Determines whether the internal Voices or Plug-
in Board Voices are used.
Voice Bank (Bank) Select a Bank for the selected Part.
Voice Number (Number) Select a Voice number in the selected Bank.
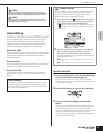
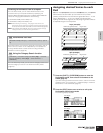
Using Category Search to assign Voices to
the Parts
Performance Voice Assign mode → select Voice display with PAGE [E][F]
→ move cursor to “Bank” or “Number” → [CATEGORY]
If selecting “Bank” or “Number,” you can select using the
Category Search function as in the Voice mode (page 24).
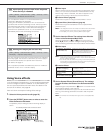
NoteLimitH Determines the highest/lowest note for each
Part.
NoteLimitL
VelLimitH Determines the maximum/minimum velocity for
each Part.
VelLimitL
Part Switch
(PartSw)
Voice Bank (Bank) Voice Number (Number)
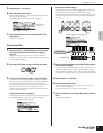
TIP
Set the note/velocity range with a Note On
message
You can also set the note/velocity range directly from a connected
MIDI keyboard by pressing the appropriate keys.
1. Select the Limit display, then press the [SHIFT] + [MUTE/
SEL/ENTER] buttons.
2. The keyboard mark appears in the top right of the display.
3. Press the desired key on the keyboard to transmit the Note
On message to the MOTIF-RACK ES.
4. When the cursor is set to “NoteLimitH” or “NoteLimitL,” the
parameter is set to the note of the pressed key (note
number).
When the cursor is set to “VelLimitH” or “VelLimitL,” the
parameter is set to the volume of the pressed keyboard
(Velocity).
TIP