


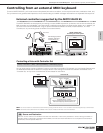

Owner’s Manual
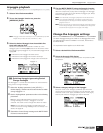
Multi mode Using Multi effects
41
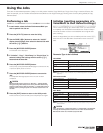
Quick Guide
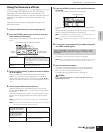
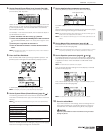
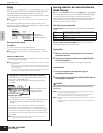
4. Set the Reverb/Chorus Effect Level for each Part ( ).
There are three parameters: “RevSend” (Reverb Send), “ChoSend”
(Chorus Send), and “DryLevel.”
Select the desired parameter using the cursor [L][M] buttons and
select the Part you wish to edit by using the Part/Element buttons
([1/5/9/13]-[4/8/12/16]). Then use the data dial to set the Effect
Send Level for each Part.
For example, in the instructions below, we'll increase the depth of
the Reverb Effect for Part 7.
1. Select “RevSend” with the cursor [L][M] buttons.
2. Check that the [MUTE/SEL/ENTER] button LED is turned off.
If the [MUTE/SEL/ENTER] button is lit, simply press it again to turn it
off.
3. Use the [3/7/11/15] button to select Part 7.
4. Turn the data dial clockwise to increase the Reverb Send
Level.
n The Reverb/Chorus Effect is not applied to any Part for which “RevSend”
or “ChoSend” is set to “0”.
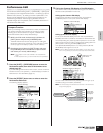
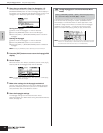
5. Enter the Effect Edit Mode.
Enter the Effect Edit mode by pressing the [EFFECT] button. The
[EFFECT] button LED lights and the following display is shown.
In this display, the System Effect settings can be edited.
n If this display is not shown, press the [EFFECT] button again.
6. Set the System Effects (Reverb/Chorus) (page 40, ).
The following parameters are used to edit the System Effects.
First select the Reverb/Chorus type, then set the Return Level and
Panning.
n For information on the Reverb/Chorus types, refer to the separate Data
List.
Select the desired parameter for editing by using the cursor [L][M]
buttons and change the settings with the data dial.
7. Set the detailed effect parameters as necessary.
Press the [EFFECT] button to call up the Effect Edit display.
The PAGE [E][F] buttons can be used to switch between Effect
types.
Select the desired parameter for editing by using the cursor [L][M]
buttons and change the settings with the data dial.
n The available parameters differ depending on the selected Effect type. For
details, refer to the separate Data List booklet.
n If “off” is selected for the Effect type, none of the Effect parameters can be
edited.
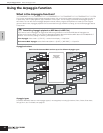
8. Set the Master Effect parameters (page 40, )
The Master Effect common to all Parts can be edited the in the
Multi Common Edit mode (page 39).
n When setting the Master Effect, make sure to turn Master Effect on. (Press
the [SHIFT] + [BYPASS], then turn “Master” parameter to “effect on”)
9. Set the Equalizer parameters (page 40, and )
The MOTIF-RACK-ES has two types of Equalization: independent
three-band Equalizers for each Part and a five-band Equalizer that
is applied to all Parts. These are edited in the Multi Edit mode
(page 39).
n For details about the equalizers, see page 60.
First, set the Part Equalizer settings in the EQ display in the Multi
Part Edit mode (page 39).
Then, set the Master Equalizer settings in the MEQ display in the
Multi Common Edit mode (page 39).
n For details about each parameter, refer to the reference section.
10. Store the edited Multi.
If you wish to save the new settings, store the settings with the
other Multi parameters as a single Multi before you leave the
selected Multi. For details about storing Multis, see page 49.
If you call up another Multi or another mode without saving, the edited
settings may be lost.
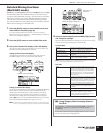
ReverbType (Reverb Type) For setting the Reverb Effect parameters.
ReverbRtn (Reverb Return)
ReverbPan (Reverb Pan)
ChoCtgry (Chorus Category) For setting the Chorus Effect parameters.
ChoType (Chorus Type)
ChoRtn (Chorus Return)
ChoPan (Chorus Pan)
ChoToRev (Chorus to Reverb) For adjusting the Send Level from the
Chorus Effect to Reverb Effect.
A
B
Effect Type (Rev, Cho)
C
D
E
CAUTION