


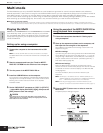

Owner’s Manual
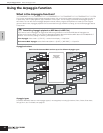
Multi mode Detailed Mixing functions (Multi Edit mode)
39
Quick Guide
Detailed Mixing functions
(Multi Edit mode)
The Multi Edit mode has a detailed mixing function that lets you
change the Multi parameter settings in the same way as the Voice
Edit mode. There are two types of Multi Edit displays: those for
Common Edit, and those for editing individual Parts (Part Edit).
Use Common Edit to edit the settings common to all Parts and Part
Edit to edit the settings for individual Parts.
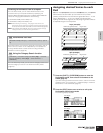
1. Press the [MULTI] button to enter the Multi mode, then
select a Multi to be edited (page 36).
If you are creating a Multi from scratch, use the convenient
Initialize function (in the [UTILITY] → JobSel display) to initialize a
Multi in the User Banks (page 47).
2. Press the [EDIT] button to enter the Multi Edit mode.
3. Call up the Common Edit display or Part Edit display.
Use Common Edit to edit the parameters for all of the Parts. Use
Part Edit to edit the parameters for each Part.
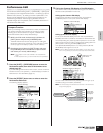
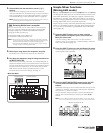
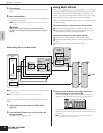
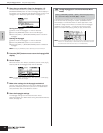
Calling up the Common Edit display
Simultaneously hold down the [SHIFT] button and press the
[COMMON] button to call up the Common Edit display.
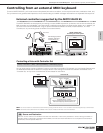
Calling up the Part Edit display
To call up the Part Edit display, first check that [MUTE/SEL/ENTER]
button LED is turned off, and then select the desired Part by
pressing the corresponding the [1/5/9/13]-[4/8/12/16] buttons
several times. You can also step through the Parts in order by
simultaneously holding down the [SHIFT] button and using the
PART [E][F] buttons. If the [MUTE/SEL/ENTER] button is lit, simply
press the [MUTE/SEL/ENTER] button again to turn off.
n If a Plug-in Board (or Boards) has been installed, you can select the Plug-
in Part 1 or 2 by pressing the [1/5/9/13] or [2/6/10/14] button several times.
4. Select the desired display with the PAGE [E][F] buttons
and change the settings.
Select the desired parameter for editing by using the cursor [L][M]
buttons and change the settings with the data dial.
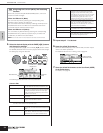
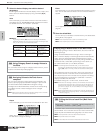
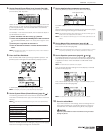
Common Edit
n Functions for assigning to the external controllers depend on the settings
of each Part’s Voice edited in the Voice Edit mode.
Part Edit
Indicates a Common Edit display.
General For setting general parameters, such as the
Voice Name, Offset values of Master EQ, etc.
MEQ (Master EQ) For setting the Master EQ for each Multi.
MEF (Master Effect) For setting the Master Effect type and
parameters.
CtrlAsn (Control Assign) For setting the Control Numbers generated by
using an external MIDI controller.
Voice For setting the Voice parameters of each Part.
Here you can set the Voice to be assigned to
each Part, as well as Receive Channel, Note/
Velocity Range, Arpeggio On/Off, Portamento,
Pitch Bend Range, etc. The Voice assigned to
each Part can be also set in the Mixing Edit
mode (page 37).
Output For setting the output jack corresponding to the
individual Parts. This lets you to apply external
effects to specific Parts. In addition, you can set
the Voice output parameters such as Volume,
Pan, Send Level of Reverb/Chorus Effect, etc.
Tone For setting the parameters that determine the
sound of the Voice, such as Pitch, Filter, and
Amplitude.
EQ (Equalizer) For setting the Master EQ for each Multi.
RcvSw (Receive Switch) For setting whether certain MIDI messages
(Bank Select, Program Change, Control
Change, Pitch Bend, Modulation Wheel, etc.)
are recognized for each Part or not.
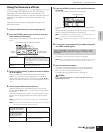
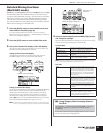
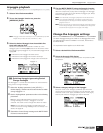
Using Category Search to assign Voices to
the Parts
Part Edit display → select Voice display with PAGE [E][F] → select Part
with [1/5/9/13] – [4/8/12/16] → move cursor to “Bank” or “Number” →
[CATEGORY]
You can select Voices using the Category Search function, just as
is done in the Voice Play mode (page 24)
Indicates the display for editing Part 1.
Make sure to turn
this LED off.
TIP