


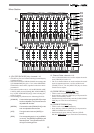


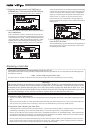

23
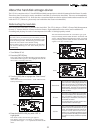
1
2
4
3
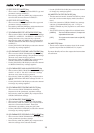
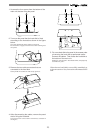
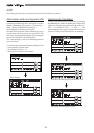
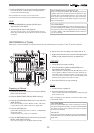
1. Unscrew the four screws from the bottom of the
main unit that are fixing the panel.
2. Turn over the panel that the hard disk is fixed
according to the instructions shown in the figure
below.
Note that hard disk cables will be connected.
Be careful not to apply excessive force when turning over
the panel.
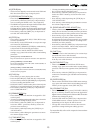
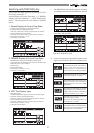
3. Remove the two cable connectors that are
connected to the hard disk.
Gently hold the connector and slowly pull out.
4. After disconnecting the cables, remove the panel
that is fixing the hard disk.
Unscrew the four screws with a screwdriver, as shown in
the Figure.
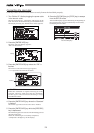
1
2
3
4
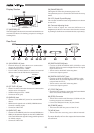
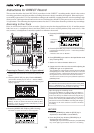
5. Fix a new hard disk to the panel in the reverse order
of removing the hard disk as performed earlier.
Connect the cables. Then house the hard disk at
the bottom of the main unit.
Follow the <Precautions> described earlier, and properly
assemble the parts.
When the new hard disk is successfully assembled, go
to the next section. Now, format the unformatted hard
disk.