


28
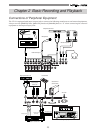
ACCESS
PHANTOM
CH STATUS/CH SEL
12345678
TRACK
910111213141516
TRACK
ABCDEFGH
INPUT
ORANGE
CH STATUS
INPUT RED REC GREEN PLAY MUTE
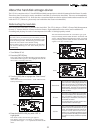
EQ/COMP
RECALL STORE
EFF1/EFF2 HI-G/F/Q
AUX1/AUX2 M ID-G/F/Q
PAN LO -G
FADER CH VIEW
PRE/POST
PRE/POST
COMP
MUTE MUTE
EFF1 EFF2
DIRECT RCL MAP
SCENE
CH PARAM EDIT
EFF EDIT
OFF
CH STATUS/CH SEL
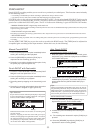
+6
-10
-20
-40
-
∞
-30
0
+6
-10
-20
-40
-
∞
-30
0
+6
-10
-20
-40
-
∞
-30
0
+6
-10
-20
-40
-
∞
-30
0
+6
-10
-20
-40
-
∞
-30
0
+6
-10
-20
-40
-
∞
-30
0
+6
-10
-20
-40
-
∞
-30
0
+6
-10
-20
-40
-
∞
-30
0
+6
-10
-20
-40
-
∞
-30
0
MASTER
+6
-10
-20
-40
-
∞
-30
0
+6
-10
-20
-40
-
∞
-30
0
+6
-10
-20
-40
-
∞
-30
0
+6
-10
-20
-40
-
∞
-30
0
+6
-10
-20
-40
-
∞
-30
0
+6
-10
-20
-40
-
∞
-30
0
+6
-10
-20
-40
-
∞
-30
0
+6
-10
-20
-40
-
∞
-30
0
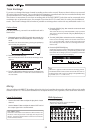
DISP SELREC TRK
END
MARK
DIRECT
CLIPBOARD
BUSS
AUTO RTN
AUTO PUNCH
REC ASSIGN
REC TRKSOURCECH STATUS
AUTO PUNCH
START
RECORD
P.EDIT
VARI
PITCH
ALIGN SEL
SETUP
SCRUB
A RTN
A PLAY
PGM SEL
OUTOUT
LOCATE
LOC MEM
ININ
4167352
UNDO/
REDO
HOLD/ EDITSTORE
PLAYSTOP F FWDREWIND
NEXTPREV
CLIPBOARD PLAY
LOCATE ABS 0
LOCATE REC END
FADER
ADJUST
SHIFT
LEVEL
ADJUST
EXIT/NO
ENTER/YES
EJECT
JOG
SHUTTLE
2/10/B 6/14/F 7/15/G 8/16/H L R5/13/E4/12/D3/11/C1/9/A
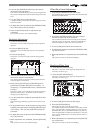
MON OUT PHONES
UNBAL INSERTBAL UNBAL
010
PHONES
010
MON OUT
LINEMIC
PEAK
LINEMIC
PEAK
LINEMIC
PEAK
LINEMIC
PEAK
LINEMIC
PEAK
LINEMIC
PEAK
8/16/H
LINEMIC
PEAK
TRIM
INPUT
7/15/G
LINEMIC
PEAK
6/14/F5/13/E1/9/A 4/12/D3/11/C2/10/B
INSERTBAL
CLEAR
OPTICAL
DIGITAL
MULTITRACKER
SCENE SEQ
TIME BASE
1
567
98
4
7
2 3
!
!
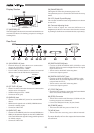
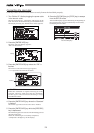
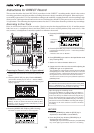
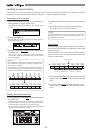
Instructions for DIRECT Record
This section describes the basic REC/PLAY procedures in the “DIRECT” recording mode, which is the easiest
recording procedure and also provides recordings that most closely resemble the original. Hints and tips to
successfully operate the VF-16 are included according to the workflow, ranging from the actual recording to mix
down process. Both experienced and novice users of multitracker should try this process so as to learn the VF-
16 operations. The following description assumes that the VF-16 has been started up without any recordings.
Preparing to Record (refer to Figure above)
1. Connect the sound source to record to the [INPUT] 1/9/
A jack.
2. Press the [INPUT SEL] key (Key: Flashes ORANGE).
[CH STATUS/CH SEL] key of ch9-16 -> Flashes GREEN
Indicates that all channels are [TRACK] (the following LCD
display appears).
WARNING!
In DIRECT Recording, all channel faders are basically
[TRACK]. If there is channel in which the [INPUT] (RED:
Flashing), press the [CH STATUS/CH SEL] key of that
channel so it is a [TRACK].
3. Press the [DIRECT-REC TRK] key (RED: Flashing).
The menu to select the track to record appears.
4. Press the [CH STATUS/CH SEL] key of ch1 (Key: Flashing
RED).
Indicates
that ch1 is
READY.
5. Press the [EXIT/NO] key to return to the Normal Display.
[CH STATUS/CH SEL] key of ch1 -> Alternately Flashes
GREEN/RED
* Indicates that trk1 is “READY”.
6. Press [RECORD] key to set trk1 to the Input Monitor mode
(Key: Flashing RED).
7. Set the ch1 fader and master fader to “0”.
8. Output sound from the sound source while adjusting the
[TRIM]1/9/A gain to an optimal level.
The guideline for optimal gain is the border of the [PEAK]
LED lighting ON or OFF, when the sound source is at the
maximum volume. Adjustments should also ensure that
the signal does not exceed 0 on the LCD level meter.
To listen to the sound turn up the [MON OUT] knob or
[PHONES] knob.
WARNING!
Be careful not to excessively raise the volume of the [MON
OUT] or [PHONES] level. Prolonged exposure to loud
sounds may have an adverse effect on hearing.
RECORD
1. Press the [REWIND] key while the [STOP] key is
depressed, to locate ABS 0 (Locate ABS 0).
2. Press the [PLAY] key while the [RECORD] key is
depressed to start recording.
The RED light of [CH STATUS/CH SEL] key and [RECORD]
key of ch1 lights up to indicate that ch1 is recording.
Recording to One Track
Here, we will record to track 1 of the recorder. Check to see that the channel faders of ch1-16 and the master
fader are set to -∞ (completely down) and that [TRIM] A to H are set to LINE position (fully turn to left). Also
use (connect) a headphone or monitor speakers to monitor the sound.
Tips: Changing the recording mode
To change the DIRECT recording mode to the BUSS re-
cording mode, press the [BUSS-REC TRK] key while the
tracks to be directly recorded are selected using the step
above. "Rec Mode Change!" appears and "Sure?" flashes
on the screen. Pressing the [ENTER/YES] key cancels the
selection of tracks for the DIRECT recording and changes
the display to the track selection screen for the BUSS
recording.