


42
EQ/COMP
EFF1/EFF2 HI-G/F/Q
AUX1/AUX2 MID-G/F/Q
PAN LO-G
FADER CH VIEW
PRE/POST
PRE/POST
COMP
CH PARAM EDIT
flashing
flashing
flashing
flashing
lighting
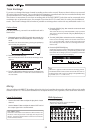
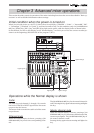
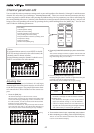
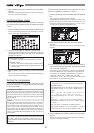
Channel parameter edit
You can edit the various parameter settings such as pan and equalizers for channels 1 through 16 and the master
channel. We refer this type of editing as "Channel parameter edit". There are several channel parameter edit keys
on the top panel (as shown below) and pressing the dedicated key for the parameter you want to edit brings up
the corresponding edit screen. Some keys also handle the second parameter (labeled under the key) and you can
bring up the corresponding edit screen by pressing the key while holding down the [SHIFT] key. You can view
and/or edit the following parameters.
• Pan setting
• 3-band equalizer setting
• Effect send level setting
• Pre/post selection of the effect send
• Aux (auxiliary) send level setting
• Pre/post selection of the Aux (auxiliary) send
• Compressor setting
• Fader level setting
• Channel view (viewing only)
<Hints>
If a channel whose source is set to INPUT via the IN-
PUT SEL setting is selected as the edit channel, the
channel name is shown as below.
In the following example, channel 9 which is set to
INPUT, is selected as the edit channel.
Adjusting Pan
You can adjust the pan (or balance) of each input
channel signal fed to the stereo outputs, as well as fed
to the Rec buss outputs. The panpot for master chan-
nel controls the L/R level balance of the stereo out-
puts.
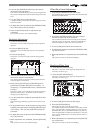
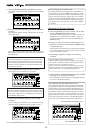
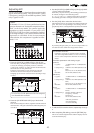
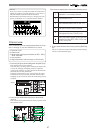
1. Press the [PAN] key.
All channel settings are shown on the screen.
The first time you bring up the channel parameter edit
screen, the message prompting to select a channel ("Se-
lect CH!") flashes, as well as all the CH STATUS/CH SEL
indicators on the panel flash.
From the second time on, the previously selected chan-
nel is selected and ready to be edited when bringing up
the screen (as shown in the drawing of step 2 below).
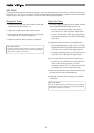
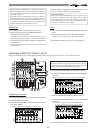
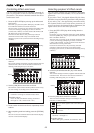
2. Press the [CHA STATUS/CH SEL] key of the desired chan-
nel.
The current settings are shown, together with the selected
channel name. The icon for the selected channel is flash-
ing, indicating that you can edit it.
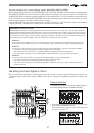
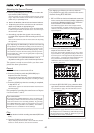
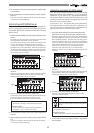
3. Use the [JOG] dial to adjust panning.
Rotating the [JOG] dial to the left or right moves the pan
position to the left or right respectively.
The following show examples of the pan settings.
Pan position:
center
Pan position:
hard left
Pan position:
hard right
•Controllable channels
Channels 1 through 16 and the master channel
•Available values
L10 (hard left) through C (center) to R10 (hard
right) (the default setting: "C" for all channels)
* Values are displayed between L10 and R10 in 21
steps but the actual pan setting is changed smoothly
and continuously as rotating the [JOG] dial.
4. To set another channel's pan, repeat steps 2 and 3 above.
5. After completing pan editing, press the [EXIT/NO] key.
The VF-16 exits the channel edit mode and the display
returns to the Normal display.