


29
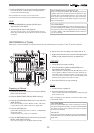
ACCESS
PHANTOM
CH STATUS/CH SEL
12345678
TRACK
910111213141516
TRACK
ABCDEFGH
INPUT
ORANGE
CH STATUS
INPUT RED REC GREEN PLAY MUTE
EQ/COMP
RECALL STORE
EFF1/EFF2 HI-G/F/Q
AUX1/AUX2 MI D-G/F/Q
PAN LO-G
FADER CH VIEW
PRE/POST
PRE/POST
COMP
MUTE MUTE
EFF1 EFF2
DIRECT RCL MAP
SCENE
CH PARAM EDIT
EFF EDIT
OFF
CH STATUS/CH SEL
+6
-10
-20
-40
-
∞
-30
0
+6
-10
-20
-40
-
∞
-30
0
+6
-10
-20
-40
-
∞
-30
0
+6
-10
-20
-40
-
∞
-30
0
+6
-10
-20
-40
-
∞
-30
0
+6
-10
-20
-40
-
∞
-30
0
+6
-10
-20
-40
-
∞
-30
0
+6
-10
-20
-40
-
∞
-30
0
+6
-10
-20
-40
-
∞
-30
0
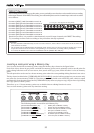
MASTER
+6
-10
-20
-40
-
∞
-30
0
+6
-10
-20
-40
-
∞
-30
0
+6
-10
-20
-40
-
∞
-30
0
+6
-10
-20
-40
-
∞
-30
0
+6
-10
-20
-40
-
∞
-30
0
+6
-10
-20
-40
-
∞
-30
0
+6
-10
-20
-40
-
∞
-30
0
+6
-10
-20
-40
-
∞
-30
0
DISP SELREC TRK
END
MARK
DIRECT
CLIPBOARDCLIPBOARD
BUSS
AUTO RTN
AUTO PUNCH
REC ASSIGN
REC TRKSOURCECH STATUS
AUTO PUNCH
START
PGM SEL
RECORD
P.EDIT
VARI
PITCH
ALIGN SEL
SETUP
SCRUB
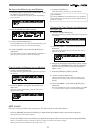
A RTN
A PLAY
TIME BASE
SEL
OUTOUT
LOCATE
LOC MEM
ININ
4167352
UNDO/
REDO
HOLD/ EDITSTORE
PLAYSTOP F FWDREWIND
NEXTPREV
CLIPBOARD PLAY
LOCATE ABS 0
LOCATE REC END
FADER
ADJUST
SHIFT
LEVEL
ADJUST
EXIT/NO
ENTER/YES
EJECT
JOG
SHUTTLE
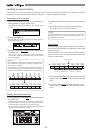
2/10/B 6/14/F 7/15/G 8/16/H L R5/13/E4/12/D3/11/C1/9/A
MON OUT PHONES
UNBAL INSERTBAL UNBAL
010
PHONES
010
MON OUT
LINEMIC
PEAK
LINEMIC
PEAK
LINEMIC
PEAK
LINEMIC
PEAK
LINEMIC
PEAK
LINEMIC
PEAK
8/16/H
LINEMIC
PEAK
TRIM
INPUT
7/15/G
LINEMIC
PEAK
6/14/F5/13/E1/9/A 4/12/D3/11/C2/10/B
INSERTBAL
CLEAR
OPTICAL
DIGITAL
MULTITRACKER
11
45
3
2
3
7
!
6
!
!
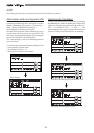
PLAY
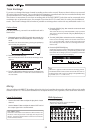
1. Press the [REWIND] key while the [STOP] key is
depressed to locate ABS 0.
2. Press the [PLAY] key to start playback.
The play level of track 1 can be adjusted with the ch1
fader. This concludes the procedures to check the sound
recorded.
Tips: UNDO/REDO
Press the [UNDO/REDO] key after recording to return to
the prerecording state (UNDO). Press the [UNDO/REDO]
key again to return to the original state of the recording
on track 1 (REDO). The UNDO/REDO function is effective
for all recordings.
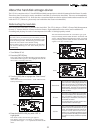
Cancel READY Status of Recording Track
Press once again the [DIRECT-REC TRACK] key that is lit
up RED, then press the [CH STATUS/CH SEL] key of the
channel that is in the READY mode to cancel the ready
state of the track recorded and to put that track in the
SAFE mode. Then press the [EXIT/NO] key to return to
the Normal Display.
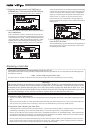
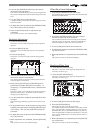
RECORDING to 2 Tracks
With track 1 now recorded, we will record the stereo sound source to tracks 15 and 16 of the recorder.
Preparing to Record
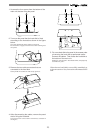
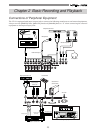
1. Connect the stereo sound source to record to [INPUT]
jacks 7/15/G and 8/16/H.
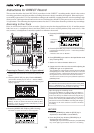
2. Press the [DIRECT-REC TRK] key (RED: Flashing).
3. Press the [CH STATUS/CH SEL] key for ch15 and ch16
(RED: Flashing).
Trk15 and 16 will go to the “READY” mode. The other
tracks will be in the “SAFE” mode (Key: Light OFF).
4. Press the [EXIT/NO] key.
[CH STATUS/CH SEL] key of ch 15 and 16 -> GREEN/RED:
Alternately Flash
* Indicates that trk15 and 16 are “READY”.
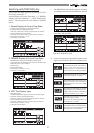
5. Press the [RECORD] key to put trk15 and 16 in the Input
Monitor mode (RED: Flashing).
Trk15 and 16 will got to the Input Monitor mode.
6. Set the ch15 and ch16 fader and master fader to “0”.
7. Output sound from the sound source while adjusting the
[TRIM] 7/15/G and 8/16/H gain to an optimal level.
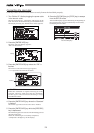
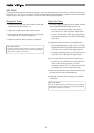
RECORD
1. Locate the time to start recording.
2. Press the [PLAY] key while the [RECORD] key is
depressed to start recording.
The [CH STATUS/CH SEL] key and [RECORD] key of ch15
and 16 lights up RED to indicate that the channels are
recording. By increasing the fader level of track 1, the
user can record to tracks 15 and 16 (overdubbing) while
listening to the playback sounds of track 1.
3. Press the [STOP] key to stop recording.
PLAY
1. Locate the time to playback.
2. Press the [PLAY] key to start playback.
Ch1, ch15 and ch16 faders can be used to adjust the play
level of each track.
After recording, put the “READY” track in the “SAFE” mode,
as described earlier.
Tips: UNDO/REDO
Press the [UNDO/REDO] key after recording to return to
the prerecording state (UNDO). Press the [UNDO/REDO]
key again to return to the original state of the recording
on two tracks (REDO).
Tips: MUTE
Press the [CH STATUS/CH SEL] key in the Normal Display
to MUTE (silence) that channel ([CH STATUS/CH SEL] key:
Light OFF).
3. Press the [STOP] key to stop the recording operations.
The LCD will show a “Please Wait” message and then
return to the Normal Display.
This completes the process to record on track 1.
Check the sound recorded using the following procedures.