


45
flashing
flashing
4. To set another channel's pre/post selection, repeat steps
2 and 3 above.
5. After completing the pre/post selection, press the [EXIT/
NO] key.
The VF-16 exits the channel edit mode and the display
returns to the Normal display.
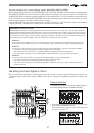
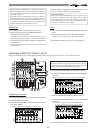
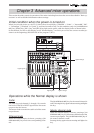
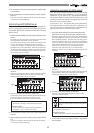
Controlling AUX SEND level
You can control send levels of channels 1 through 16
(pre- or post-fader) from the AUX SEND jack on the
rear panel. The master channel controls the AUX send
master level.
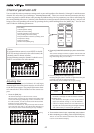
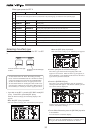
1. Press the [AUX1/AUX2] key to bring up the AUX send level
screen.
Each time you press the [AUX1/AUX2] key, the AUX1 send
level and AUX2 send level screens alternate.
The first time you bring up the channel parameter edit
screen, the message prompting to select a channel
("Select CH!") flashes, as well as all the CH STATUS/CH
SEL indicators on the panel flash. From the second time
on, the previously selected channel is selected and ready
to be edited when bringing up the screen (as shown in
the drawing of step 2 below).
2. Press the [CH STATUS/CH SEL] key of the desired
channel.
The current settings are shown, together with the selected
channel name. The icon for the selected channel is
flashing, indicating that you can edit it.
flashing
3. Use the [JOG] dial to control the send level.
The numeric value and the marker position of the rotary
pot icon change according to the current level.
("80", the default value, is the reference level.)
•Controllable channels:
Channels 1 through 16 and the master level.
•Available values:
00 to 99 (dB), (the default setting: channels 1
through 16: “00”, master level: “80”)
4. To set another channel's send level, repeat steps 2 and
3 above.
5. After completing send level editing, press the [EXIT/NO]
key.
The VF-16 exits the channel edit mode and the display
returns to the Normal display.
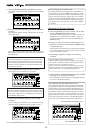
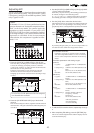
Selecting pre/post of AUX sends
You can select whether the pre-fader or post-fader
signal is fed from each channel (1 to 16) to the AUX
SEND jack. If you select "Post", the signal adjusted by
the channel fader is sent to the effect processor, so if
you lower the channel fader, the signal sent to the ef-
fect processor is also lowered.
If you select "Pre", the signal that is not affected by
the channel fader is sent to the effect processor, so
even if you lower the channel fader to minimum, the
signal can be sent to the effect processor.
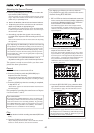
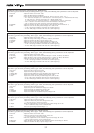
1. Press the [AUX1/AUX2] key while holding down the
[SHIFT] key to bring up the pre/post selection screen.
Each time you press the [AUX1/AUX2] key while holding
down the [SHIFT] key, the pre/post selection screens for
EFF1 and EFF2 alternate. The first time you bring up the
channel parameter edit screen, the message prompting
to select a channel ("Select CH!") flashes, as well as all the
CH STATUS/CH SEL indicators on the panel flash.
From the second time on, the previously selected
channel is selected and ready to be edited when
bringing up the screen (as shown in the drawing of step
2 below).
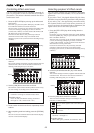
flashing
2. Press the [CH STATUS/CH SEL] key of the desired
channel.
The current settings are shown, together with the selected
channel name. The icon for the selected channel is
flashing, indicating that you can edit it.
3. Use the [JOG] dial to switch the selection.
The icon color and label changes according to the
selection, as shown below.
The pre-fader signal is fed to the AUX SEND
jack.
The post-fader signal is fed to the AUX SEND
jack.
•Controllable channels:
Channels 1 through 16.
•Available options:
PRE or PST (post) (default: all channels: “PST”)
4. To set another channel's pre/post selection, repeat steps
2 and 3 above.