


33
flashing
PUNCH IN/OUT
Punch IN/OUT recording enables you to record over previously recorded parts. This function comes in handy
in the following cases.
* If a recording is unsatisfactory in either recording or performance and you want to redo it.
* If you want to record a solo part to another track while listening to the backup tracks.
PUNCH IN refers to the process to switching from PLAY to REC. On the other hand, PUNCH OUT refers to the
reverse process, to switch from REC to PLAY. The time to punch in is called the PUNCH IN point, and the time to
punch out is called the PUNCH OUT point. The VF-16 features the following 3 types of PUNCH IN/OUT modes.
* MANUAL PUNCH IN/OUT using the key on the main unit
This feature is used for rough recordings. Manual punch in/out is not recommended during a performance since the process
requires using your hands.
* PUNCH IN/OUT using the foot switch
Recording is possible even during a performance since all punch in/out processes are controlled from the foot switch.
* AUTO PUNCH IN/OUT
Detailed recording is possible since recording takes place with the punch in/out time preset (programmed) prior to the
recording.
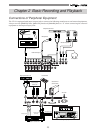
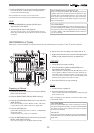
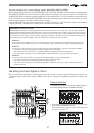
Use the [DIRECT-REC TRK] key to put the track to record in the READY mode. The [TRIM] must be adjusted to
an optimal gain according to the input monitor. When this is set, do the following:
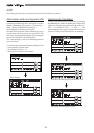
Manual Punch IN/OUT
1. Press the [PLAY] key from the point immediately before
starting the recording and then playback.
2. Press the [RECORD] key while the [PLAY] key is
depressed to start recording (punch in).
3. Recording is canceled and playback takes place if only
the [PLAY] key is pressed (punch out).
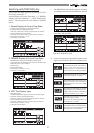
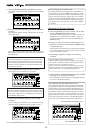
Punch IN/OUT with Foot switch
1. Connect a “Fostex Model 8051” foot switch to the [FOOT
SW] jack on the rear panel of the VF-16.
2. Press the [PLAY] key from the point immediately before
starting the recording, then playback.
3. Recording starts by stepping on the foot switch (punch
in).
4. Recording is canceled and playback takes place when
the foot switch is stepped on again (punch out).
Tips: Rehearsal
Step on the foot switch while the [STOP] key is depressed
to start rehearsing the recording (“Rhrsl On” will appear
on the LCD then “RHSL” will light ON).
Rehearsal instructions are the same as recording with
the foot switch.
However, stepping on the foot switch will go to input
monitor, and stepping on it again will cancel it. To cancel
the rehearsal mode, step on the foot switch again while
the [STOP] key is depressed (“Rhrsl Off” will appear
on the LCD then “RHSL” will light OFF).
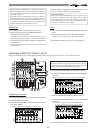
Auto Punch IN/OUT
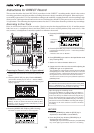
* Programming the PUNCH IN/OUT points
1. While the system is in the PLAY or STOP mode, press
the [HOLD/>] key at the time to program as the PUNCH
IN or PUNCH OUT point.
2. Press the [STORE] key (RED: Light ON).
3. The PUNCH IN point is programmed when the [AUTO
PUNCH IN] key is pressed. The PUNCH OUT point is
programmed when the [AUTO PUNCH OUT] key is
pressed.
Tips:
When programming a PUNCH IN/OUT point, the time of
the punch IN point must always be before the time of the
PUNCH OUT point. If the PUNCH OUT point precedes the
PUNCH IN point, a [Void Out!] error message appears on
the LCD and prevents use of the AUTO PUNCH mode.
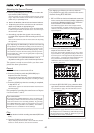
* AUTO PUNCH IN/OUT recording
1. Press the [RECORD] key while the [SHIFT] key is
depressed to go to the “AUTO PUNCH Mode”.
2. LOCATE the point immediately before starting the
recording.
3-1. The recordings are rehearsed if only the [PLAY] key is
pressed.
3-2. Press the [RECORD] key while the [PLAY] key is
depressed to start recording [TAKE].