4-5
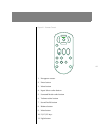
Nº40 Media Console Remote Control
the relative volume of some subset of your speakers to meet your
requirements.
There is another incremental change you can make to the
“balance” of Nº40 audio processing. By pressing and holding the
balance button, you can alter the relative delays of the various
speakers in your system. This can be used to “tweak” the speaker
delays to create an extra sense of space, or (on the center channel)
to move the vocalist forward or back in the mix without altering
the basic volume of the vocals relative to the rest of the instru-
ments. You could even use it to accommodate an off-center
listening position. (There is a better way of handling such things.
See “Sound Profile Menu” on page 5-19.)
After a few seconds, the balance mode will “time-out.” Alterna-
tively, you can press the enter button to return to normal operation
more quickly.
Mute button
Pressing the mute button will reduce the main output level of the
Nº40 audio processor by a user-modifiable amount, ranging from 1
to 100 decibels. When engaged, an LED indicator above the mute
button on the front panel lights up to indicate that the system is
muted. Pressing the mute button a second time without adjusting
the volume will return it to its previous setting.
The magnitude of the mute function is determined by the Mute
level item in the User options: Volume Options menu.
If you adjust the volume with either the front panel volume knob
or the volume rocker button on the remote control while the
system is muted, the Nº40 will adjust its volume from the muted
volume and disengage the mute function. The factory default
setting of the mute circuit is -20 dB. (See The Nº40 Menu System for
information on changing the factory default setting.)
F1, F2, F3 function
keys
There is a wide range of functionality provided by the Nº40. If there
were a button for every one of those functions, its remote control
would be too large. Instead, we provide two mechanisms for quick
and easy access to those features you especially like to use.
The menu button calls up a toolbar that includes the setup menu
and several other items of interest. You can edit this toolbar as you
see fit, with the exception of the first item: the setup menu must
always be accessible, and cannot be removed. If you have two or
three functions that you want to access even faster, you can use the
function keys. You (or your installer) can specify which features
each of these three buttons will “trigger.” This is done in the User
options: Control Options menu of the setup menu. You might asso-
ciate any of these function keys with a particular sound profile
(saving you from scrolling through a list), or a listener position, or a
THX toggle, or even a particular input. The list of options is quite
extensive, and the choice is entirely yours, based on whatever
makes the most sense to you.


