


92
BACKING SECTION
SONG MODE
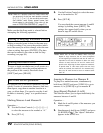
3. Use the Position Controls to select the meas-
ure to be marked as “B.”
4. Press [SET-B].
You can check the current measure A and B
settings by holding down [SHIFT]. The
settings also appear briefly when you set
them in steps #2 and #4 above.
Note: ABOUT THE “A” AND “B” MARKS—When using the
Repeat or Copy functions, the “A” mark corresponds
to the beginning of measure A and the “B” mark cor-
responds to the end of measure B. When the Jump
function is used, both the “A” and “B” marks corre-
spond to the beginning of those respective measures.
A specific beat or 16th note (other than the first)
cannot be marked; the marks are for measures only.
Also, the “B” mark cannot be set to a measure earlier
than “A.”
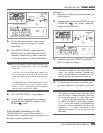
Jumping to Measure A or Measure B
To jump to a marked measure, simultaneously
hold down [SHIFT] and press [JUMP-A] to go to
measure A, or [JUMP-B] to go to measure B.
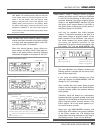
Loop (Repeat) Playback (A to B)
This function allows you to repeat indefinitely the
measures between A and B.
Operation —
1. Mark the A and B points of the measures you
wish to repeat.
2. Simultaneously hold down [SHIFT] and press
[A-B REPEAT ]. The “repeat” indication
appears in the SONG box.
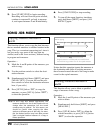
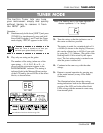
SONG EDIT MODE (SONG EDITING)
Note: When at a position where no event exists and
you press any of the four main position controls
([n], [v], [ /], or [ m]), the currently active pat-
tern number, mute status, pattern name, and
chord appear in the display. (Also refer to the
note in “POSITION CONTROLS,” page 81.)
Make sure that the Song mode is selected before
attempting the following operations.
Editing (Changing) Recorded Events
Editing a recorded event is done in the same way
as Step recording. First, move the position indica-
tor to the event you wish to change, select the new
value or setting, then press [ENTER]. (The data
that can be entered is the same as that for Step
recording; see page 89.)
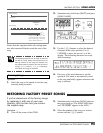
Erasing Recorded Events
To erase a single recorded event (or all events at a
specific position), move the position indicator to
the position of the event(s), then hold down
[SHIFT] and press [ERASE].
Set-A and Set-B Operations
By using the Set-A and Set-B operations, you can
specify a series of consecutive measures, and have
them repeat, copy them to another location in a
song, or delete them. You can also use the A and
B marks to instantly “jump” to a specified meas-
ure.
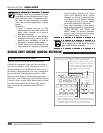
Marking Measure A and Measure B
Operation —
1. Use the Position Controls [<<] [<] [>] [>>]
to select the measure to be marked as “A.”
2. Press [SET-A].