


84
BACKING SECTION
SONG MODE
Then, using [6 CURSOR] move the cursor
arrow to SONG in the display and select an
empty song number with the [–]/[+] buttons
for recording. (Song number 8 has been
deliberately left blank for this purpose.)
If there are no empty songs, you’ll have to
use the Measure Delete function to erase a
song before continuing (see pages 94-95).
You can check for empty songs by trying to
play back each song; “SONG EMPTY”
briefly appears in the display if the song has
no data, and the song will not play back, and
pressing [START/STOP] has no effect.
HINT
CHECKING FOR DATA IN A SONG—Another
way to check whether a song is empty or
not is to make sure the position indicator is
at the beginning of the song, then simulta-
neously press [ /] and [ m] to go to the last
recorded data in the song. If the position
indicator stays at the same place, the song
is empty.
2. Make sure that the position indicator in the
display is at the start of the song. (Simultane-
ously press the [n] and [v] buttons if neces-
sary.)
Note: Generally, you should start recording at the
beginning of a song, since the GW50 needs to
recognize both a chord and a pattern to start
playback. If the starting measures of a song are
empty, but there is pattern data in later meas-
ures, the GW50 automatically provides a default
chord (C) and the METRO pattern (No. 246) for
the empty starting measures. (Since the METRO
pattern has no bass or accompaniment parts,
however, the chord sound cannot be heard while
METRO is playing.) If the song has no pattern
data, but other data exists, the GW50 auto-
matically provides a METRO pattern for the en-
tire song.
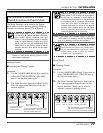
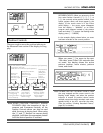
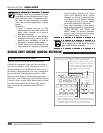
3. To enable song recording, simultaneously hold
down [SHIFT] and press [SONG REC].
Recording is now in standby. (The SONG LED
flashes and the cursor arrow in the display auto-
matically moves to the PTN or TEMPO box.)
REALTIME RECORDING MODE (REALTIME RECORDING)
Note: You can cancel recording here by pressing
[SONG REC] again (without [SHIFT]).
4. Using [6 CURSOR], more the cursor arrow
to PTN in the display and select the pattern
number with which you wish to start the
recording with the [–]/[+] buttons.
Note: Once a pattern has been set for a song, it
cannot be changed during Realtime recording
(the cursor arrow cannot be moved to the PTN
box in the display). However, you can change
and enter patterns by using Step recording op-
erations if necessary. (See page 88.)
5. You may also want to select the chord for the
start of the song. Do this from the Chord
section (see page 74), or by using the
CHORD RECALL function of the Pedal
Switches (see page 86).
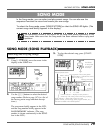
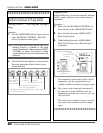
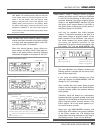
6. Press [START/STOP] to start recording. (The
pattern and chord that you selected in steps
#4 and #5 above are automatically entered to
the first 16th note in the song, and a dot
appears at the position to indicate recorded
events.)
The Position Controls ([n], [v], [/], [m]) can
be used to “pause” the song during Realtime
recording (for recording standby), and select
a different measure or position in a song. To
resume recording, simply press [START/
STOP]. (For more information, refer to Hint
#7 on page 88.)
Note:When a song is running, the LCD
display in Realtime recording is the same as
that for song playback (see page 79).