


105
OTHER FUNCTIONS
MIDI
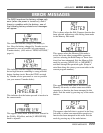
TURNING INDIVIDUAL EFFECTS ON AND OFF FROM A CONNECTED DEVICE
2. Two different sets of Control Change num-
bers can be used for this operation: 91 – 95,
or 116 – 120. Select which set of numbers
you wish to use with the [–]/[+] buttons.
Note: If you are using the Yamaha MFC06 MIDI
Foot Controller, set this to 116 – 120. If
you are using another device, check the
MIDI Implementation of that device to de-
termine which Control Change numbers to
use.
3. Press any of the mode buttons ([MANUAL],
[MEMORY], or [SONG/PATTERN]) to
return to normal operation.
Once you’ve set the Control Change numbers
in the above operation, use the operation
below to actually receive Control Change
messages on the GW50.
Operation —
1. Make sure all MIDI have been made properly
(see connection examples B and C on page
101). Also, set the MIDI transmit channel on
the connected device to 1.
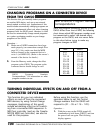
2. Transmit a value of 0 with the appropriate
Control Change message to turn the desired
effect on and off (the transmitted message
acts as a toggle switch between on and off).
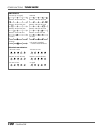
(Refer to the chart below for Control Change
number/Effect correspondence.)
Effect Control Change number
Compressor 92 (or 116)
Distortion 94 (or 117)
Equalizer 95 (or 118)
Chorus 93 (or 119)
Reverb/Delay 91 (or 120)
Note: Control Change messages can be received
in the main modes and the Memory Edit
mode of the Effect section and any of the
Backing section modes.
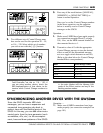
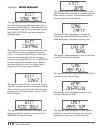
SYNCHRONIZING ANOTHER DEVICE WITH THE GW50
Since the GW50 transmits MIDI clock
messages, you can have a sequencer and
connected tone generator play back in
perfect time with the Backing parts of the
GW50. In this way, you can add other instru-
mental parts from the tone generator (such
as melodies, riffs, etc.) to the accompani-
ment, bass and drum patterns of the GW50.
Operation —
1. Make sure all MIDI connections have been
made properly (see connection example E on
page 101).