


87
BACKING SECTION
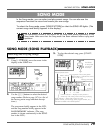
SONG MODE
HINT
RECOMMENDED RECORDING ORDER—Even
though there are no immutable rules to fol-
low when recording a song, it’s generally
best to start by recording chord changes
over a single basic rhythm pattern, then
adding additional events as needed.
HINT
ENSURING PROPER TIMING IN REALTIME RE-
CORDING—In Realtime recording, timing is
important. You can make it easier to enter
events in time by recording the song at a
slow tempo. This gives you a better chance
of “hitting” each event precisely. However,
if you make a mistake in the timing while
recording an event, you can always use Step
recording and song editing techniques (see
page 88) to erase the mistake and then
enter it in the proper place.
HINT
RECORDING IN SECTIONS—Keep in mind that
you can also start recording from the middle
of a song. This would come in handy when
you have a fairly complex song with a lot of
chord changes and mute status changes
that would be difficult, or impossible, to
record all at once.
Think of the song in sections, and stop the
recording (or pause it using the Position
Controls) at the end of each section. Then,
to record the next section, use the position
controls to move to the desired measure
(or slightly before), and begin or resume
recording as usual. Of course, if you want
to, you can start recording from the
beginning and “jump in” when you’re ready
to record the next part.
HINT
OVERDUB RECORDING—You can use the
same technique as described in Hint #2
above to “overdub” events, or record differ-
ent events over the measures in two or
more passes. For example, you can record
chord changes in the first pass and effect
program changes in the second.
REALTIME RECORDING MODE (REALTIME RECORDING)
2
3) Hints on Realtime Recording
HINT
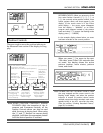
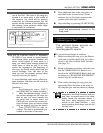
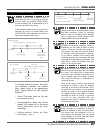
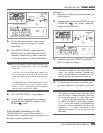
ENSURING PROPER SONG ENDING—Keep in
mind that the end of the song is not the
point at which you pressed [START/STOP]
to end recording, but is determined by the
last event entered in the song.
In the example shown below, the last event
recorded to a song is a chord change, and
[START/STOP] was pressed to end record-
ing several measures after that.
To actually end the song at the point
you originally intended, you should
enter some event at an appropriate
point. Typical events for this purpose
would be:
1 Chord (The same chord as the last
one entered is fine.)
2 Accompaniment, Bass and Drums
muting (All turned off at the same
time; preferably done by Step
recording.)
3 Ending pattern (Done by Step
recording only.)
1
During recording:
Sound of pattern (for a two-measure pattern)
Measures
Last event
(chord change)
START / STOP
pressed here
(intended end of
song)
During playback:
No sound
(since nothing has been recorded here)
Playback
stops here
Intended
end of song
Measures
3
4
5
At beginning of
two-measure pattern
At intended
end of song
At beginning of
intended last measure
*
Enter one of these events.
1
2
3