


VOICE MODE
108
VOICE EDIT
In Voice Edit Mode you can edit any and all parameters which make up a voice, including Insertion
Effect assignment and parameter settings, as well as controller settings. You can go directly to Voice
Edit Mode from any mode and start editing the currently selected voice at any time, even while the
sequencer is running.
1
1
ELEMENT SELECT
2
2
3
3
4
4
5
1
6
2
7
3
8
4
9 10
ELEMENT
11 12 13 14 15 16
ON/OFF
COMMON FILTERAMP EFFECTPITCH CONTROLLFO
VOICE EDIT
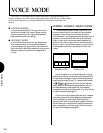
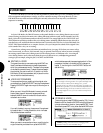
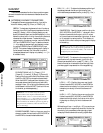
In Voice Edit Mode, the TRACK buttons on the panel double as voice editing function access and
control, letting you choose the main voice editing functions with one touch, and in Normal Voice Edit
Mode, select the AWM elements and turn them on and off. The orange lights in the VOICE EDIT and
TRACK buttons will always indicate the voice editing status, including which elements are selected or
switched on or off, and which element edit function is currently selected. Also, in Voice Edit Mode, the
VOICE EDIT button doubles as a compare button, to let you compare the sound of the original voice
to the sound of the voice you re creating.
Normal voice editing starts with either an initialized voice (see page 110) when you want to edit a
voice from scratch, or a Preset, GM, Internal, Song or optional External voice when you want to modify
an existing sound. Drum voice editing starts with an existing Preset or GM drum voice. Accessing all
voice editing features rarely takes more than the press of a button or two, and adjusting parameter
settings is just as simple, using the JOG, INC/DEC and KEYPAD.
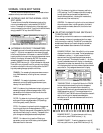
● EDITING A VOICE
The types of sounds you can create using the W5/W7 are
literally endless, since there are hundreds of parameters
which you can access and modify. The steps in the process
of voice editing are as follows: (1) select a track and assign
the voice that you want to edit to it; (2) switch into Voice
Edit Mode; (3) edit the parameters; and (4) store the voice
into an Internal voice bank memory.
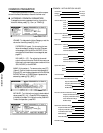
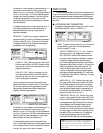
● VOICE EDIT/COMPARE
To compare the voice you re editing to the original voice
you started from. Press VOICE EDIT and play the keyboard.
Pressing VOICE EDIT again returns you to the voice you re
editing.
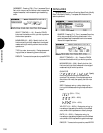
When you are in Voice Edit Mode but have not yet modi-
fied any data, there will be a small square positioned
between the MIDI channel number of the track and the
voice bank and number.
If you edit the data in any way, the square will be replaced
by a capital letter E inside a black box, which indicates
that the data has been modified.
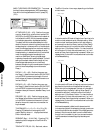
When you want to compare the voice you re editing to the
original voice that you started from, press VOICE EDIT,
which doubles as an edit/compare toggle switch. In Com-
pare status, the letter in the black box will change to a
capital C , and the light in the VOICE EDIT button will
start blinking.
NOTE: Whenever you select a voice, it is temporarily located in
the voice buffer. Choosing another voice replaces the buffer with
the selected voice. When you are editing a voice, you are
operating on the voice which is currently in the voice buffer. The
W5/W7 is very flexible, so you can switch back and forth between
modes without losing your newly created voice. However, once
you call up a different voice, your voice will be cleared from the
voice buffer.
● STORING A VOICE
To store the voice, press STORE followed by [F3] ( Voice ).
Rotate the JOG or press the INC/DEC buttons to choose an
Internal voice memory location, then press ENTER. To exit
Store Mode, press EXIT or any other desired MODE button.
˚ NOTE: Depending on the selected voice, changing certain
parameters may not create an audible change.