


SONG MODE
74
SONG MULTI
The Song Multi function lets you assign an Instrument
voice to each of the 16 Track buttons on the panel, plus
designate all sound mixer and other settings for each track as
well as for the overall mix including volume, panning and
digital effects settings, as well as tuning, note shift and pitch
bend parameters.
A song multi , also referred to as a multi , is the complete
configuration of all MIDI, voice, mixer and other assignments
and settings which determine the operating status of the W5/
W7 within each song , or song memory location.
Depending on your particular needs for a setup, i.e.,
whether you are composing, practicing, recording, or perform-
ing live or are using the W5/W7 as a master keyboard
controller or as a slave tone generator a song multi may be
comprised of multi settings (i.e., all parameter settings), song
sequence data, and accompanying Song voice bank, or it may
be comprised of multi settings with accompanying Song voice
bank, or it may be comprised of multi settings only.
A song multi can be stored in any of the 16 song memories
in the W5/W7 and saved to floppy disk and loaded back in via
the disk drive. And since each song memory also contains a
Song voice bank into which you can store up to 128 normal
voices and 2 drum voices copied from the Internal, Preset or
GM voice bank (or the External voice bank if the optional
Expansion Wave/Voice Board is installed). You can organize an
entire bank of Song voices specifically for a single multi. This
lets you keep all data for a multi together in one place, i.e.,
inside a single song memory. (NOTE: Sequence data and Song
voice data are not retained in memory when the power is
turned off.
Always save your important song data to floppy disk
before turning off the power
.)
NOTE: Song multis can be saved to floppy disk and loaded back into
the W5/W7 in various ways, including all 16 songs with accompany-
ing Song voice banks, one song only, and one song with accompany-
ing Song voice bank. (For more information on saving to and loading
from disk, see Disk Mode, page 131.)
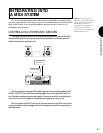
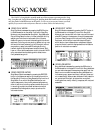
● DEFINING A SONG MULTI
There are literally hundreds of parameters which make up a
song multi, but only four basic steps involved in the process
of creating and defining the multi, as follows:
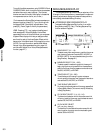
1. SELECT A SONG MEMORY
In Song Multi Play Mode, press [F2] ( Seq ) to access the
Song Sequence Play function, then select a song memory
location (01 ~ 16). Then press [F1] ( Mlt ) to jump to the
Song Multi function, which displays the mixer screen.
The
currently selected song is the currently selected multi.
SIMULTANEOUS NOTE CAPACITY - The W5/W7
can play up to 32 notes at once (either from the key-
board or the sequencer). During playback, any new
notes which would exceed this number will be ignored.
NOTE: The sequencer will not run when the W5/W7 is in Song
Edit, Song Job, Utility, or Disk Modes, nor will it run when the
Song Setup function is selected. Likewise, when the sequencer is
running in record or playback modes you cannot enter Song
Edit, Song Job, Utility, or Disk Modes, nor can you select the
Song Setup function.
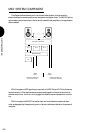
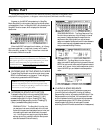
● SELECTING TRACKS FOR PLAYBACK
Use the 16 memory select buttons to select the tracks for
playback. The track button of each track with data in it will
be lit in green. A red track button indicates the currently
selected track.
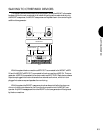
● TRACK SOLO AND MUTE
When a song is playing back, pressing SOLO lets you isolate
one or more Instrument voices as the song plays. The SOLO
button will become red, indicating that the W5/W7 is in
Solo Mode. In Solo Mode, tracks with sequencer data in
them will be either red (solo status), or green (mute status).
SOLO - After pressing the SOLO button the currently
selected Track button will become red, indicating that it
is in solo status. Also, it will be the only sound you
hear. You can solo more than one track at a time.
MUTE - The other tracks with data in them will all be
green, indicating that they are in mute status, or are
turned off, and therefore you won t be able to hear
them.
EXIT - To exit Solo Mode, simply press the TRACK
SELECT button.