


APPENDIX
155
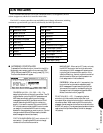
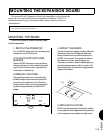
MOUNTING THE EXPANSION BOARD
The optional W5/W7 Expansion Wave/Voice Board allows you to increase the
amount of voices and AWM elements by an additional 4Mbytes. (NOTE: For
information about the types of boards available, please consult your nearest
Yamaha dealer.)
IMPORTANT NOTE: Caution! Mounting the Expansion Wave/Voice Board may erase the internal memory.
Be sure to save all internal data to floppy disk before installing the board.
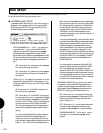
MOUNTING THE BOARD
To mount the Expansion Wave/Voice Board, please
follow the steps below.
1. SWITCH THE POWER OFF
Turn the W5/W7 power switch off, and disconnect
its power cord from the AC outlet.
2. PLACE ON A STURDY LEVEL
SURFACE
Place the W5/W7 face down on a sturdy table or
other level surface. (In order to keep from scratch-
ing the finish of the instrument, lay a blanket or
thick towel on the table first.)
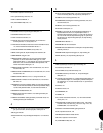
3. REMOVE THE COVER
Using a phillips screwdriver, unscrew the eight
screws holding the square cover into place, and
remove the cover as shown in the illustration
being extremely careful not to drop the screws or
any other foreign materials into the W5/W7 s
chassis.
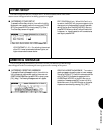
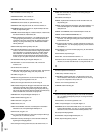
4. MOUNT THE BOARD
Holding the board by its edges, check to make sure
the two connectors on the Expansion Board are
facing the same direction as the two ports on the
W5/W7 s circuit board. Then, position the Expan-
sion Board over the four supporting clips, as
illustrated, and carefully insert the Board, applying
equal downward pressure on all four corners. The
Board should click into place. Do not apply excess
pressure to the Board.
5. REPLACE THE COVER
When the board has clicked into place, the installa-
tion process is finished. Reposition the square cover
over the access hole and reattach the eight screws.