


BEFORE YOU BEGIN
41
DATA ENTRY
The W5/W7 provides many convenient ways to access and manipulate data. The
various multi-purpose buttons, sliders and controllers allow you to go directly to any
function, in usually the touch of a single button, and rarely more than two or three. The
large LCD screen and other visual indicators give you ample feedback to always let you
know exactly where you are and what status the W5/W7 is in.
Selecting parameters and entering data entry is equally straightforward. The basic data
entry section is made up of a keypad, four-way cursor controls, increment and decrement
buttons and a jog/shuttle dial.
Following is a breakdown of the various indicators and data controls:
LCD SCREEN - The 240 x 64 dot Liquid Crystal Display with adjustable
contrast provides graphic, numeric and much other visual information de-
pending on the selected mode or current status.
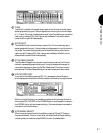
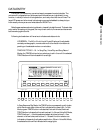
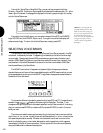
TRACK BUTTONS 1 ~ 16 - In Song Play, Voice Play and Song Record
Modes, the TRACK buttons let you select any track in the multi the selected
TRACK button will be indicated with a red light.
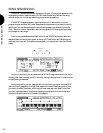
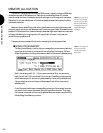
1
1
ELEMENT SELECT
2
2
3
3
4
4
5
1
6
2
7
3
8
4
9 10
ELEMENT
11 12 13 14 15 16
ON/OFF
COMMON FILTERAMP EFFECTPITCH CONTROLLFO
F1 F2 F3 F4 F5 F6 F7 F8
VOICE EDIT
SHIFT EXIT
In Song Sequence Play Mode, the TRACK buttons corresponding with tracks
which have music data in them will be indicated with a green light. (In Solo
Mode, a green TRACK button indicates that the track is muted, and a red
TRACK button indicates that the track is soloed.) In Normal Voice Edit Mode,
TRACK buttons 1 ~ 4 double as element select switches, buttons 5 ~ 8 as
element on/off switches, and buttons 9 ~ 16 as edit function selectors as
indicated on the panel directly above each button. When in Voice Edit Mode,
the selected buttons will be indicated with orange lights.