


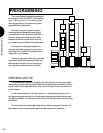


GETTING STARTED
62
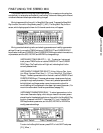
1. SELECT A SONG MEMORY AND DEFINE THE MULTI
From within Song Play Mode, press [F2] ( Seq ) and select a song memory
location (01 ~ 16), then press [F1] ( Mlt ) to jump to the Song Multi function and
assign Instrument voices to Tracks, so that when you record, all you have to do is
press a TRACK button in preparation for recording each Instrument part. (For
more information about selecting songs, see page 80. For more information about
song multis, see page 74.)
2. RECORD THE SONG PARTS
After defining the multi, press [F2] ( Seq ) again, then press RECORD; this
engages the record standby mode, where you determine quantizing, metronome
click status, tempo, time signature, and realtime or step record status. After
determining these, press the TRACK button assigned with the Instrument voice of
the first part you want to record. Then press RUN to either perform the part in
realtime or input the performance in step-time. When you re finished, press
STOP/TOP. Then record other Instrument parts in the same way. (For more
information about song recording, see page 85.)
3. EDIT SONG EVENTS
After recording, if you want to single out and change any event, or insert new
events (including program change and other MIDI control messages) inside any
measure in any track, press EDIT in the Mode section on the panel. Locate the
specific event to change, or the place to insert an event, with the SHUTTLE,
which lets you rewind and fast forward through the measures, or the CURSOR
keys. Insert and change data with the JOG, INC/DEC and KEYPAD. (For more
information about song editing, see page 91.)
4. PERFORM SONG JOBS
You can press JOB in the Mode section on the panel in order to perform opera-
tions like appending one song onto another, deleting and inserting measures,
transposing specific tracks, modifying gate time and velocity, and others. (For
more information about song jobs, see page 95.)
5. FINE-TUNE THE MIX
After creating a song sequence, you can have it play back in a loop, or chain more
than one song sequence to play back one after another using the Next Song
feature in the Song Setup function [F3] ( Setup ). By pressing [F1] ( Mlt ), you
can make adjustments to volume levels and panning, System Effect send levels,
and other parameters for each track in the multi. You can also assign completely
different voices to tracks, or even switch into Voice Edit Mode while the se-
quencer is running and make modifications to specific voice parameters in
context with the overall mix. When you re finished, you can dub your digital
masterpiece to cassette, DAT, or other format simply by pressing RUN!
6. SAVE THE SONG TO FLOPPY DISK
When you ve finished creating a song sequence, or if you re in the middle of the
process and have to stop, save the song to floppy disk, so you can load it back
into the W5/W7 the next time you need it and pick up from where you left off.
A
lways save important music data to floppy disk.