


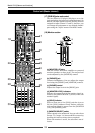

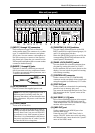
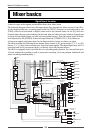


Model LR16 [Names and functions]
31
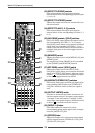
d) Remain
The remaining time of the hard disk is
displayed. It is displayed only while arming
tracks or during recording. Increasing the
number of recording tracks decreases the
remaining time.
e) Sampling frequency and bit rate
The combination of sampling frequency and
bit rate currently selected in the "Default FS"
menu item in the "System" menu of the MENU
mode is displayed. When recording a new
project, this combination is applied.
If the displayed combination does not match
the current project, it flashes.
f) Protection
The lock icon is displayed when the current
project is protected. You cannot make
recording or editing when a protected project
is loaded. You can protect or deprotect the
current project using the "Protect" menu item
in the "Project" menu of the MENU mode.
g) Level meters for stereo busses
The signal levels of the stereo L and R busses
are displayed.
h) Tracks
A record-armed track is displayed in flashing.
When you starts recording, it changes from
flashing to lighting.
Recorder
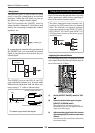
Icon
During playback
During recording
During forwarding
During rewinding
i) Level meters for tracks 1 through 16
Each level meter shows the input (recording)
level when the corresponding track is in record
ready or record mode, while it shows the track
playback level when the corresponding track
is being played back.
j) Panel lock
When the panel lock function is engaged, the
panel lock key icon is displayed. When the lock
key is displayed, the operation keys on the
recorder section of the main unit are disabled.
<Examples>
If you arm track 4: "4" flashes.
c) Time display
The current ABS time of the current project is
displayed in "hour:minite:second:frame"
format. If no recording has been made to the
internal hard disk, the time display shows
"--H--M--S--F". During recording or playback,
the current recorder status icon is shown in
the frame digit, as below.
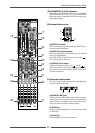
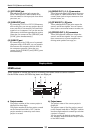
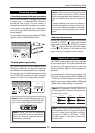
MENU mode screen
While the recorder stopped, pressing the [ENTER]
key in the recorder section of the main unit enters
the MENU mode and brings up the following screen.
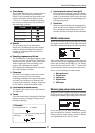
Memory play setup mode screen
While the recorder stopped, pressing the [MEMORY
SETUP] key in the recorder section of the main unit
brings up the memory play setup screen as below.
This screen allows you to select a main menu. By
using the [MENU] dial to highlight the desired main
menu and pressing the [ENTER] key, the display
shows the next menu level. (The ">" icon on the
screen indicates that the next menu level exists.)
There are the following five main menus.
1. Mark point menu
2. Project menu
3. Input menu
4. System menu
5. USB menu
In this screen, you can make setting for memory
play including the channel assignment, playlist
setting and play mode setting, as well as destina-
tion assignment of the "Sub In" signal.
If you arm stereo mix track using the [ST
MIX] key: "LR" flashes.