


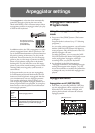

The arpeggiator in Combination and Multi modes
97
Quick StartIntroductionSetupProgram
Combination
MultiEffectGlobalArpeggiatorDrum Kit
External control
Other functions
Appendices
Dual polyphonic arpeggiator set-
tings
The dual polyphonic arpeggiator functionality lets
you do the following things.
• Assign an arpeggiator for each timbre. Choose
from Off, (arpeggiator) A, or (arpeggiator) B.
☞step 5
• Independently specify whether A and B will
operate. ☞step 6
• Select an arpeggio pattern and set parameters
independently for A and B. ☞step 7
• Make Scan Zone page settings so that you can
use keyboard range or playing velocity to
switch between normal playing and arpeggi-
ated playing, or to switch between arpeggiators
A and B. ☞step 8
• Make settings for timbres that will be silent
when the arpeggiator is Off, and will sound
only when the arpeggiator is On. ☞step 10
Arpeggiator on/off
Each time you press the [ARP ON/OFF] button,
the arpeggiator will be switched on or off. When
on, the [ARP ON/OFF] button will light. The
selected arpeggio pattern will begin when you
play the keyboard. The on/off setting is saved
when the combination is written into memory.
Note: If “Assign” is Off or “Arpeggiator Run” is
not checked, the arpeggiator will not operate even
if this key is on.
Arpeggiator settings
1. Select COMBI 0: Play, Prog page.
Select programs for the timbres that you wish
to use. For this example, select any desired
program for timbres 1–4.
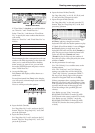
2. Select COMBI 2: Ed–TimbreParam. MIDI page.
For the timbres that you will be using, set
“Status” to INT, and set “MIDI Channel” to
Gch or to the global MIDI channel (set in
GLOBAL 1: MIDI “MIDI Channel”).
For this example, set timbres 1–4 to a “Status”
of INT, and timbres 5–8 to a “Status” of Off. Set
the “MIDI Channel” of timbres 1–4 to Gch.
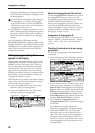
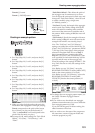
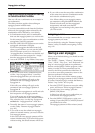
3. Select COMBI 7: Ed–Arp/Ctrls, Setup page.
4. Set “ (Temp)” to specify the tempo.
This is the same as for a program (☞p.92).
However, the tempo is shared by both
arpeggiators A and B.
5. Make “Assign” settings.
Assign arpeggiator A or B to the desired
timbres. Each timbre will be played by the
arpeggiator that has been assigned to it.
6. Make “Arpeggiator Run” settings.
Check the arpeggiator(s) that you want to
operate. The arpeggiator(s) checked here will
run when the [ARP ON/OFF] button is turned
on.
With the settings shown in the display for steps
2 and 3, turning the [ARP ON/OFF] button on
will cause arpeggiator A to operate for timbres
1 and 2, and arpeggiator B to operate for timbre
3. When the [ARP ON/OFF] button is turned
off, timbres 1–4 will sound as a layer.
If all timbres “Assign” are Off, or if neither
“Arpeggiator Run” A or B is checked, the
arpeggiator will not function.
7. In the Arp. A and Arp. B pages, set the
parameters for arpeggiators A and B.
The parameters for A and B are the same as for
a program (☞p.92).
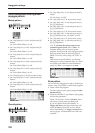
8. In the Scan Zone page, specify the range in
which arpeggiators A and B will operate.
The parameters for A and B are the same as for
a program (☞p.94).
You can use keyboard ranges or playing
velocity to operate the arpeggiator, or to switch
between arpeggiators A and B. By using the
COMBI 5: Ed–Key Zone, Key page and COMBI
6: Ed–Vel Zone, Vel page to set keyboard ranges
and velocity ranges in conjunction with each
other, you can create even more variations.
9. If you wish to save the edited combination
settings in internal memory, turn off memory
protect in Global mode, and write the
combination.