Arpeggiator settings
100
Editing a user arpeggio pattern in
Program mode
If you enter this mode from the Program mode,
your editing will apply to the arpeggio pattern
specified for the selected program.
1. In Program mode, select a program for which
the arpeggio pattern you wish to edit is
selected, or a program that you wish to use as a
basis for editing the arpeggio pattern.
2. Press the [ARP ON/OFF] button to turn the
arpeggiator on (the button will light).
Even if you moved to Global mode from a
program in which the arpeggiator was turned
off, you can use the [ARP ON/OFF] button to
turn it on.
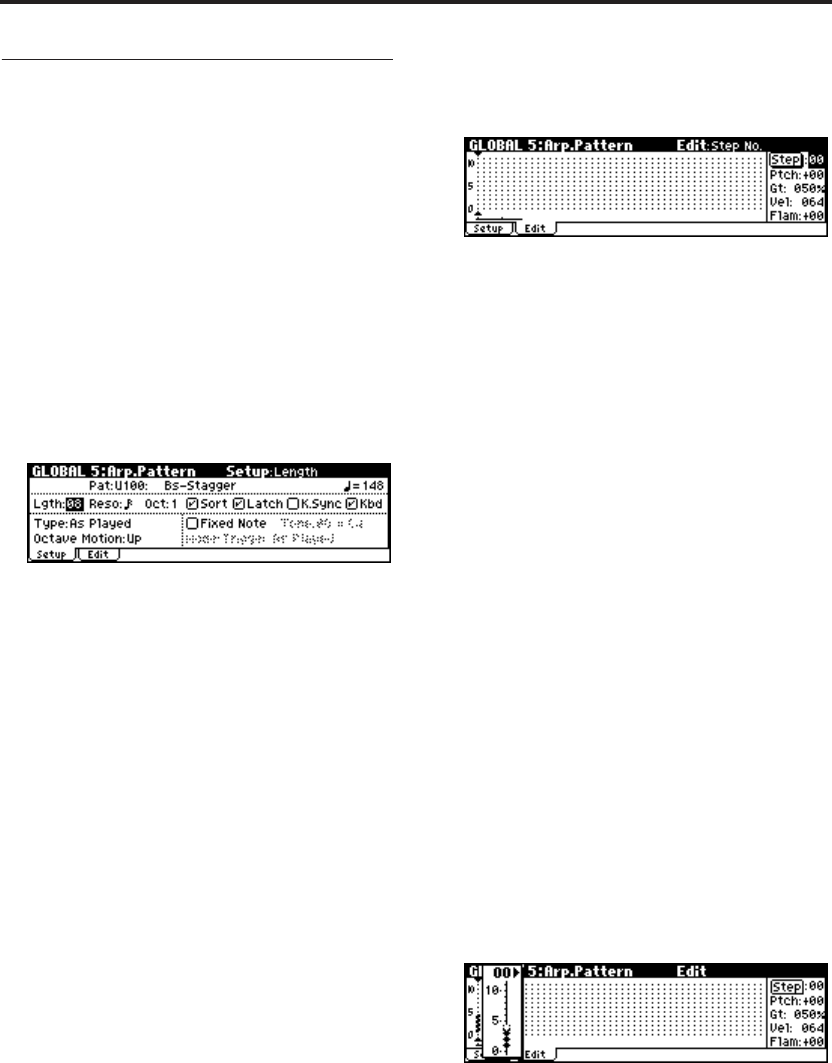
3. Access the GLOBAL 5: Arp.Pattern, Setup page.
4. In “Pattern,” select the arpeggio pattern that
you wish to edit.
For this example, select an empty user arpeggio
pattern.
If a blank pattern is selected, playing the
keyboard will not start an arpeggio.
Note: Although preset arpeggio patterns Preset-
0–Preset-4 can be selected, they cannot be
edited.
5. In “Lgth (Length),” specify the length of the
pattern.
After the pattern has played for the length
specified, it will return to the beginning. This
setting can also be changed during or after
editing. For this example, set it to 8.
6. Make settings for the “ (Tempo),” “Reso
(Resolution),” “Oct (Octave),” “Sort,” “Latch,”
“K.Sync (Key Sync.),” and “Kbd (Keyboard)”
parameters.
Note: These are program parameters, but can be
set from here as well.
If after moving here from Program mode, you
modify these parameters and wish to keep
your changes, return to Program mode and
write the program. These parameters are not
saved by “Write Arpeggio Pattern.”
For this example, make the settings shown in
the illustration 3.
7. The “Type (Arpeggio Type),” “Octave Motion,”
and “Fixed Note” parameters specify how the
arpeggio will be developed.
These settings can be changed during or after
editing.
8. Access the Edit page.
A pattern consists of Steps and Tones.
• Step: A user arpeggio pattern can have a maxi-
mum of 48 steps. The arpeggiator will play
from the first step, in steps equal to the timing
value specified by “Reso (Resolution).” The
vertical lines of the grid shown in the center of
the display indicate the steps.
Use “Step (Step No.)” to select the step. For
each step, specify “Ptch (Pitch Offset),” “Gt
(Gate),” “Vel (Velocity)” and “Flam.”
To change the step, use the ClickPoint to select
“Step” (Step No.), and then use the [VALUE]
dial or [INC][DEC] button to select the desired
step. In this page you can use the ClickPoint
[√][®] to move between steps.
• Tone: At each step, a chord consisting of up to
12 tones (Tone No. 00–11) can be sounded.
The grid of horizontal dotted lines in the center
of the display indicate the tones.
When “Step (Step No.)” is selected, you can
press the center of the ClickPoint to specify the
tone.
Use the ClickPoint [π][†] to select a tone, and
press the center to enter that tone. The tone will
switch on/off each time you press the center.
Use the ClickPoint [√][®] to move to the next
or previous step. Select a step, use [π][†] to
select a Tone, and then press the center to enter.
Press the [MENU/OK] button when you’re
finished.
To input tones, select “Step (Step No.)” and
then use numeric buttons [0]–[9], [–], and [./
HOLD] to input tones.
The “Tone No.” corresponds to the [0]–[9], [–],
and [./HOLD] buttons as shown below. Each
time you press a [0]–[9], [–], or [./HOLD]
button, the corresponding tone will be turned
on/off. The horizontal lines of the grid shown
in the center of the display indicate the tones.
Tone00–09: [0]–[9] buttons


