Using the 16-track sequencer
126
r
E-60/E-50 Music Workstation
Select “Replace” if the track contains data you wish
to replace with new data. This erases all data of the
selected track from the place where you start record-
ing until the end. (“Replace” is selected by default for
empty tracks.)
Select “Mix” to add new notes to the ones already
recorded on the selected track. This recording mode is
particularly useful for recording the rhythm track
(10) because you can first record the bass and snare
drums, then add a few tom hits here and there and
record the HiHat, for example.
(“Mix” is selected by default for tracks that already
contain data.)
(12) If you don’t want to start and stop recording man-
ually, use the PUNCH fields:
• Press the [PUNCH¥IN] field and use the [DATA÷ENTRY]
dial or the [DEC]/[INC] buttons to specify the measure
where recording should start.
If you start playback a few bars before this position,
the sequencer will activate recording as soon as it
reaches this measure.
• Press the [PUNCH¥OUT] field and use the
[DATA÷ENTRY] dial or the [DEC]/[INC] buttons to spec-
ify the measure where recording should end.
Recording is deactivated when the sequencer reaches
this position. Playback will continue, however and
needs to be stopped using the [PLAY÷STOP¥®÷ª] but-
ton.
• To take advantage of the PUNCH IN/OUT function,
you need to switch on the [PUNCH¥IN] and/or
[PUNCH¥OUT] button icon.
Note: The Punch In/Out function can also be assigned to an
optional footswitch (see p. 56). For those applications, there is
no need to set the PUNCH IN & OUT positions beforehand. But
you still need to press the [FOOT¥PUNCH¥IN÷OUT] field.
(13) If necessary, press the [OCTAVE] field and set the
required octave transposition (–4~4).
This allows you to record “special noises” (usually
assigned to the lowest notes numbers), like the ones
of fingers sliding over guitar strings, etc., if the
selected sound provides them.
(14) Specify how long the count-in should be before
recording starts: press the [COUNT-IN] field and use
the [DATA÷ENTRY] dial or the [DEC]/[INC] buttons to
select one of the following options.
(15) If you want to record tempo changes, press the
[TEMPO¥REC¥SW] field and use the [DEC]/[INC] but-
tons to select “On”.
This option allows you to use the TEMPO
[√SLOW][FAST®] buttons and/or [TAP] to vary the
tempo while recording. Those changes are recorded
to the MASTER track.
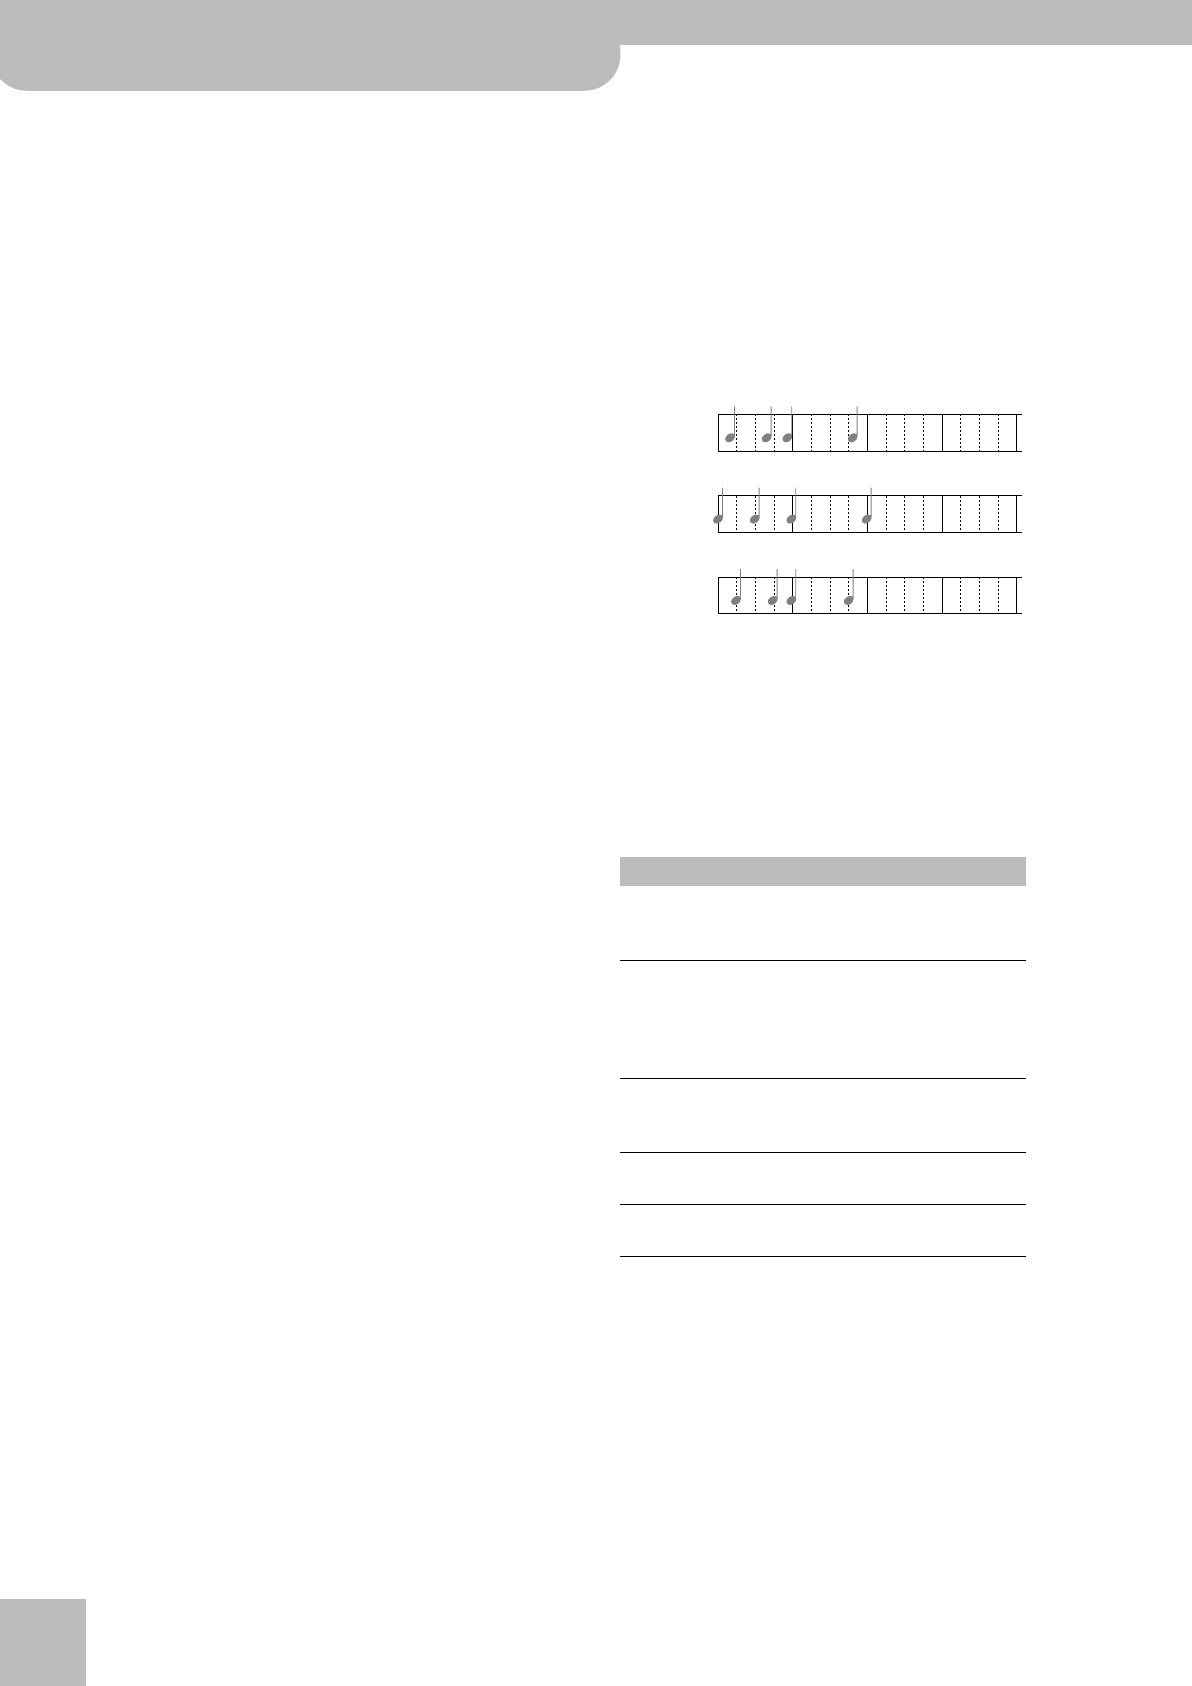
(16) Press the [INPUT¥QUANTIZE] field and set the
desired resolution.
Quantize corrects the timing of your notes by shift-
ing them to the nearest grid mark. Use the
[DATA÷ENTRY] dial or the [DEC]/[INC] buttons to spec-
ify the number of steps per measure (i.e., the resolu-
tion). Here is an example:
The setting range is: Off, 1/4, 1/8, 1/8T, 1/16, 1/16T,
1/32, 1/32T and 1/64. As this Quantize function
changes the way in which your notes are recorded,
you may want to select “Off” here. The 16-track
sequencer has a second Quantize function that you
can use more selectively (i.e., for notes that are defi-
nitely late/early). See p. 130.
(17) Specify what should be recorded by activating the
corresponding RECORDING SELECT button icons:
(18) Select the desired sound for your new track.
(19) Select the bar where playback and/or recording
should start:
• Press the RECORDER [TOP¥|√] button to return to the
beginning of the song (measure “1”). —or—
• Use the RECORDER [‰] (or [º]) button to select a
measure slightly ahead of where you want to start
recording.
(20) Press the [PLAY÷STOP¥®÷ª] button or play the first
notes (if you selected COUNT IN= “Wait Note”).
Off No count-in. Recording starts as soon as you
press the [PLAY÷STOP¥®÷ª] button (while
[REC¥∏] flashes).
1 Meas Recording starts after a 1-bar count-in.
2 Meas Recording starts after a 2-bar count-in.
Wait Note Recording starts as soon as you play a note on
the keyboard. (There will be no count-in.)
RECORDING SELECT Meaning
NOTE Only note messages are recorded.
(Pitch Bend, modulation, etc., data
are ignored.)
CONTROL CHANGE Control change messages, such as
modulation (CC01), expression
(CC11), etc. (CC00 and CC32 bank
select messages also belong to this
group.)
PROGRAM CHANGE Program change messages. Only
necessary if the track should use
different sounds.
PITCH BEND Left/right movements of the
BENDER/MODULATION lever.
SYSTEM EXCLUSIVE SysEx messages for the MASTER
track.
12341
12341
12341
This is how you
played it.
1/8
1/16
E-60_50_OM_UK.book Page 126 Thursday, June 22, 2006 10:06 AM


