


46
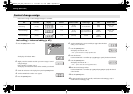
Settings (Edit mode)
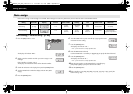
Here’s how to assign a control change message to a controller.
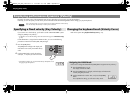
Basic editing (-> Advanced editing (p. 47))
fig.H-Edit.eps
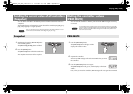
1
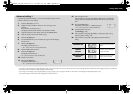
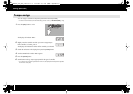
Press the [EDIT] button so it’s lit.
fig.D-Edit.eps
The display will indicate “EDIT.”
fig.D-r1.eps
2
Slightly move the controller to which you want to assign a control
change message.
If the controller is a button, press it.
The display will indicate the number of the controller you selected.
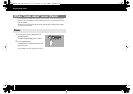
3
Check the indication in the display, then press the [ENTER] button.
fig.D-CC.eps
4
Turn the VALUE knob to make “CC” appear.
5
Press the [ENTER] button.
fig.D-CCEdit0.eps
6
Turn the VALUE knob or press controller [A1 (0)] to select the basic
editing “CC0” indication.
fig.D-ChannelSelect.eps
7
Press the [ENTER] button.
The display will indicate “CH- -.”
* The - - portion shows the currently specified value.
8
Enter the channel.
Use the VALUE knob or controllers [A1 (0)]–[B2 (9)] to specify the desired channel.
fig.D-NoteSelect.eps
9
Press the [ENTER] button.
The display will indicate “N- - -.”
* The - - - portion shows the currently specified value.
10
Enter the control change number.
Use the VALUE knob or controllers [A1]–[A8] and [B1]–[B8] to specify the desired
control number.
11
Press the [ENTER] button.
12
As appropriate for the type of controller, make button mode settings (p. 64) or
virtual center click settings (p. 65).
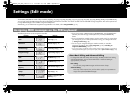
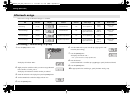
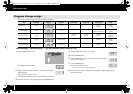
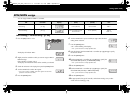
Control change assign
Edit
Controller Display
MIDI transmit
channel
Control number Value range Port Button mode
Basic editing
[A1 (0)] 1–16
0–127
(00–7FH)
0–127 (00–7FH)
PORT1
(fixed)
Unlatch, Latch,
Increase
Advanced editing 1 [A2 (1)] 1–16
0–127
(00–7FH)
You can specify an
upper and lower limit
PORT1,
PORT2,
PORT1+2
Unlatch, Latch,
Increase
Advanced editing 2 [A3 (2)] 1–16
0–127
(00–7FH)
Simulates a rotary
encoder
PORT1,
PORT2,
PORT1+2
—
PCR-300_500_800_e.book 46 ページ 2006年12月19日 火曜日 午後2時59分