


47
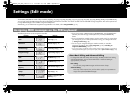
Settings (Edit mode)
Advanced editing 1
In control change assign advanced editing 1, you can specify an upper and lower
limit for the control change data, in addition to setting the items available in basic
editing.
1. Press the [EDIT] button so it’s lit.
2. Slightly move the controller to which you’re assigning a control change
message. If the controller is a button, press it.
The display will indicate the controller number.
3. Check the indication in the display, then press the [ENTER] button.
4. Turn the VALUE knob to make the display indicate “CC.”
5. Press the [ENTER] button.
6. Turn the VALUE knob or press controller [A2 (1)] to make “CC1” appear.
7. Press the [ENTER] button.
8. Enter the channel.
9. Press the [ENTER] button.
10. Enter the control change number.
11. Press the [ENTER] button.
12. Specify the range of values.
(-> Specifying the value range (upper/lower limits) (p. 45))
13. Specify the output port.
(-> Port setting (p. 65))
14. According to the type of controller, make button mode settings (p. 64) or
virtual center click settings (p. 65).
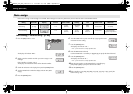
Advanced editing 2
In advanced editing 2, you can simulate the operation of a typical rotary encoder. If
this is assigned to a controller, moving the controller to the right of (or above) the
center position will produce the same result as turning the encoder clockwise.
Similarly, moving it to the left of (or below) the center position will produce the same
result as turning the encoder counterclockwise. As the controller position moves
farther away from the center, the result will be the same as turning the rotary encoder
more rapidly.
You can assign this advanced editing 2 function to a button, but it will not
operate.
1. Press the [EDIT] button so it’s lit.
2. Slightly move the controller to which you’re assigning a control change
message. If the controller is a button, press it.
The display will indicate the controller number.
3. Check the indication in the display, then press the [ENTER] button.
4. Turn the VALUE knob to make the display indicate “CC.”
5. Press the [ENTER] button.
6. Turn the VALUE knob or press controller [A3 (2)] to make “CC2” appear.
7. Press the [ENTER] button.
8. Enter the channel.
9. Press the [ENTER] button.
10. Enter the control change number.
11. Press the [ENTER] button.
12. Specify the output port.
(-> Port setting (p. 65))
PCR-300_500_800_e.book 47 ページ 2006年12月19日 火曜日 午後2時59分