


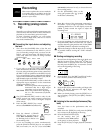

15
Chapter 2
Operation
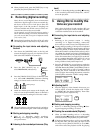
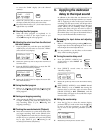
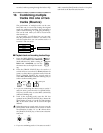
to access the “Snd✽” display (✽ is the channel
number).
5 Rotate the [VALUE] dial to adjust the amount of
the input sound that will be sent to the effect.
Be careful that the effect (“E”) level meter does not
light all the way to CLIP.
■ Selecting the effect program
6 Select the effect program as explained in “4.
Applying an effect to the input sound as you
record, ■ Selecting the effect program”.
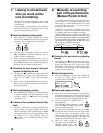
■ Adjusting the return level from the effect and
the return balance
7 Press the [EDIT] key, and then press the [EFFECT
ASSIGN] key several times to access the “EffRet”
(effect return level) display.
8 Rotate the [VALUE] dial to adjust the return level
from the effect.
9 Press the [EFFECT ASSIGN] key to access the “Eff-
Bal” (effect return balance) display.
10 Rotate the [VALUE] dial to adjust the return bal-
ance from the effect.
■ Saving the effect program
11 Refer to “4. Applying an effect to the input sound
as you record, ■ Editing the effect, ■ Saving the
effect program”.
■ Starting and stopping recording
12 After pressing the [REC] key, press the [PLAY] key
to begin recording, and press the [STOP] key to
stop recording. (Refer to p.11, “■ Starting and
stopping recording”)
■ Checking the recorded material (Playback)
13 Move the current time to a point earlier than where
you began recording. Then set the [TRACK STA-
TUS] to PLAY for the track that you recorded, press
the [PLAY] key to playback, and press the [STOP]
key to stop. (Refer to p.11, “■ Listening to the
recorded performance (Playback)”)
6. Applying the dedicated
delay to the input sound
In addition to the effect that was discussed in “4.
Applying an effect to the input sound as you record”
and “5. Applying an effect to the input sound and
recording only the input sound”, the D8 provides a
“monitor delay” that can be applied only to the input
sound. When you are recording vocals or guitar,
applying this delay will give the sound a sense of
spaciousness. This delay will not be recorded. Since
the monitor delay is not part of the internal effect, it
lets you use the internal effect in other ways.
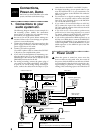
■ Connecting the input device and adjusting
the level
1 Refer to “1. Recording (analog recording), ■ Connect-
ing the input device and adjusting the level” to con-
nect the input device and adjust the level.
It is not possible to use the effect or the monitor
delay when recording digitally.
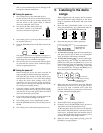
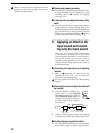
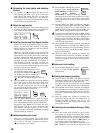
■ Turning the monitor delay on/off
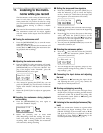
2 Press the [EFFECT ASSIGN] key
several times to select INPUT 1/2
(indicator lit).
3 Press [EFFECT] several times to access the
“MoniDly” display.
4 Rotate the [VALUE] dial to turn the monitor delay
on (o).
When [EFFECT ASSIGN] is set to INPUT 1/2 and
[REC SELECT] is set to INPUT 1/2, turning the
monitor delay on will only apply to tracks whose
[TRACK STATUS] is REC (ANALOG), and the
monitor delay will apply to the sound that is input
from the INPUT 1/2 jacks.
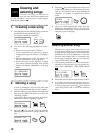
■ Editing the monitor delay
5 Press the [ ] key to select the monitor display
parameter that you wish to edit. Press the [ ] key
to move to the next parameter, or press the [ ]
key to move to the previous parameter (refer to
p.74).
6 Rotate the [VALUE] dial to set the value.
Snd1 :000
EFFECT
SEND
EffRet:080
EDIT
E
EFFECT
ASSIGN
INPUT 1/2
MASTER
EffBal:CNT
E
EFFECT
ASSIGN
INPUT 1/2
MASTER
EFFECT
ASSIGN
INPUT 1/2
MASTER
E
MoniDly:o˙
EFFECT
E
T :200ms
Recording