Connections,
Power-on, Demo
Here’s how to connect the D8 to your audio
system, and listen to the demo songs.
1. Connections to your
audio system etc.
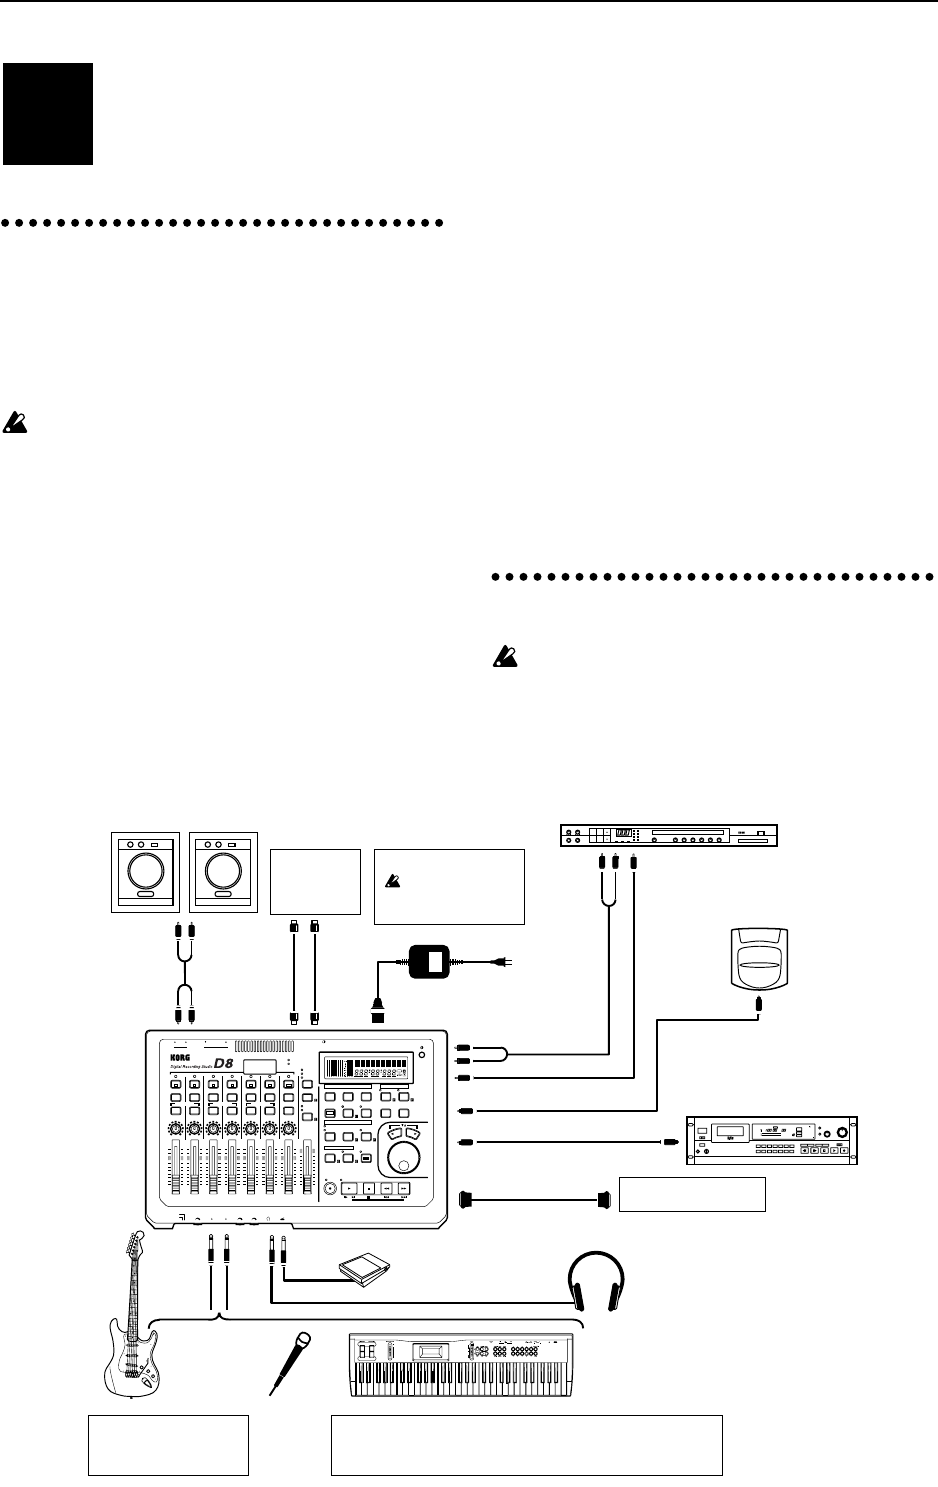
The following diagram shows a basic example of a
D8 recording system. Modify the connections
shown below as needed for your particular setup,
and connect your equipment to the D8.
Be sure to turn off the power before making con-
nections. Failure to do so can damage your speaker
system or cause malfunctions.
1
Connect the included AC/AC power supply to the
power supply connector of the D8. Then plug the
power supply into an AC outlet.
2
Connect your audio equipment.
Use an RCA phono cable to connect the OUTPUT
L/R jacks to your amplification system.
3
If you wish to use headphones for monitoring, con-
nect the phone plug of your headphones to the
PHONES jack. The volume can be adjusted by the
[PHONES] knob located at the left.
4
For analog recording, connect the phone plug of
your guitar or mic cable to the INPUT 1 jack. (Refer
to p.11) If you will be doing analog recording in
stereo, connect the cables from the output of your
stereo device to the INPUT 1 and INPUT 2 jacks.
5
For digital recording, use an optical cable to con-
nect the DIGITAL OUT of your instrument, CD,
MD or DAT player to the DIGITAL IN connector.
(Refer to p.12)
6
For mixdown to a digital recording device (DAT,
MD etc.), use an optical cable to connect the DIGI-
TAL IN of your recording device to the DIGITAL
OUT of the D8. (Refer to p.30)
7
If you wish to use an external effect via AUX IN/
OUT, connect the input of the effect to the AUX
OUT jack, and the outputs of the effect to the AUX
IN jacks. (Refer to p.23)
8
If you wish to use a foot switch to perform auto
punch in/out, to start/stop playback, or to record
tap tempo, connect a pedal switch PS1 <sold sepa-
rately> to the FOOT SW jack. (Refer to p.47)
9
If you wish to synchronize a MIDI sequencer etc. to
the D8, use a MIDI cable to connect the MIDI OUT
of the D8 to the MIDI IN of your sequencer. If you
will be using MMC, connect the MIDI OUT of your
MIDI sequencer. to the MIDI IN jack of the D8.
(Refer to p.38)
2. Power on/off
When the power is turned on, never move the
device or allow it to be jarred. Also, never turn off
the power while the HDD access indicator is blink-
ing (immediately after the power is turned on, dur-
ing recording or playback, or during track/song
editing). This can damage part or all of the data on
STEP1
Master recorder
(DAT, MD etc.)
PHONES
FOOT SW
Powered monitors etc.
Keyboard
Guitar
Mic
Headphones
Effect device
Keyboard (digital output),
CD, DAT, MD etc.
Hard Disk
Removable Disk
Drive
If you will be recording only on one track, connect your instru-
ment to INPUT 1.
INPUT 2 is used only when simultaneously recording two tracks.
A guitar or bass can be
directly connected only
to INPUT 1.
Power supply connection
Use only the includ-
ed AC/AC power
supply.
WRITE
UTILITY
PROGRAM
EDIT
DISPLAY
SELECT
INDIVIDPROGRAM BYPASS
ACHAIN/EFFECT
[BYPASS]
BCDEF
POWER
CARD
D8
Pedal switch PS-1
AC/AC power supply connector
to the AC outlet
MIDI
sequencer
YES
UNDO
DISPLAY
MODE
TRIGGER
SYSTEM
SONG/
TRACK
TO/
LOC 3
OUT/
LOC 2
PLAY
MODE
METRO
NOME
REC
MODE
TEMPO EDIT
IN/
LOC 1
EQ
7 / 8
LR
6
R
5
L
4
R
3
L
2
R
1
L
EQEQEQEQEQEQ
REC
SELECT
EFFECT
EFFECT
SEND
EFFECT
SEND
EFFECT
SEND
EFFECT
SEND
EFFECT
SEND
EFFECT
SEND
EFFECT
SEND
EFFECT
ASSIGN
SCRUBSCENE
STORE
NO
READ
LOCATOR / SCENE
REC / PLAY
PAIR ON / OFFPAIR ON / OFFPAIR ON / OFF
PAN
LRLRLRLRLRLRLR
10
9
8
7
6
5
4
3
2
1
0
PAN PAN PAN PAN PAN BALANCE
INPUT 1/2
TRACK STATUS
GREEN:PLAY
RED :REC
(ANALOG)
ORANGE
:REC (DIGITAL)
OFF :MUTE
HDD
MIDIOUTPUT
RINL OUT
MIDI
~AC9V
POWER
MASTER
INPUT 1/2
MASTER
DIGITAL IN
AUTO PUNCH
REHEARSAL
REC PLAY
MASTER7 / 8654321
GUITAR
TRIM 1 TRIM 2 PHONES FOOT SWINPUT 1 INPUT 2
LINE/MIC
STOP REW FF
TEMPO / MOTRONOME
MODE
MIDI
IN·OUT
OUTPUT L
·R
INPUT
AUX IN L
·R
AUX OUT
DIGITAL IN
DIGITAL IN
SCSI
SCSI
DIGITAL OUT
DIGITAL OUT
OUTPUT
L
·R
INPUT
INPUT 1 2
