


21
Step 2: OverdubbingStep 3: Mixdown
Step 4: Mastering
Step 1: Quick Recording Quick Start
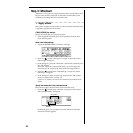
Check the level
Assign the audio from your keyboard to tracks, and check the levels.
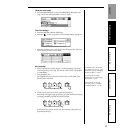
1. Press the track 5 and 6 [TRACK STATUS] keys to select INPUT (LEDs
lit orange).
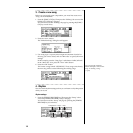
2. Press the [METER/TRACK VIEW] key. In the screen that appears,
press the “ ” button to open the dialog box.
3. In the Select DisplayMode dialog box, select the “PreFaderLev” radio
button and press the “OK” button.
When you play your keyboard, the channel 5 and 6 level meters will
move.
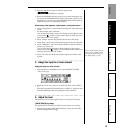
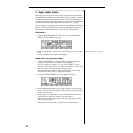
4. While watching the level meters, turn the INPUT 5 and 6 [TRIM]
knobs so that the level is as high as possible without allowing the
level meters to reach “CLP” when you play your keyboard most
loudly.
Set the input level by turning the [TRIM] knob so that the peak indi-
cator (the LED near the [TRIM] knob) lights when the volume is
loudest.
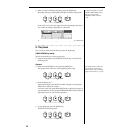
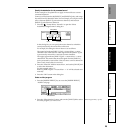
Check the sound
1. Set the [CHANNEL 5, 6] faders to unity gain (0 dB).
2. In the [SOLO/MONITOR] “Monitor” tab page, make sure that the
“MasterLR” button is “On.”
3. While playing your keyboard, slowly raise the [MASTER] fader.
You will hear the sound through your headphones or monitor speak-
ers.
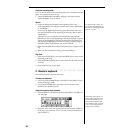
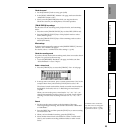
Set the [TRACK STATUS] keys
Set the status of the recording tracks, playback tracks, and other tracks.
1. Press the track 5 and 6 [TRACK STATUS] keys to select REC (LED lit
red).
2. Press the track 7 and 8 [TRACK STATUS] keys to select PLAY (LED
lit green).
3. Press the [TRACK STATUS] keys of the remaining tracks to select
MUTE (LED dark).
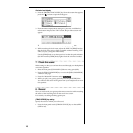
Make effect settings
Use the [INSERT EFFECT] “InsAsn,” “InsEff1,” and “InsEff2” tab pages
to make insert effect settings. For details on the procedure, refer to “4.
Make insert effect settings” (→p.24).
Step 2: Overdubbing