


Edition 3
Rev G
10-4
Section 10
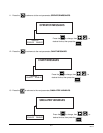
10.5 CHART DEMONSTRATION
Allows the user to demonstrate the chart capabilites. CAUTION: When this "TEST" is intiated, any parameter
values previously programmed will be replaced with the demonstration values.
Step 1
With CHART DEMONSTRATION in the lower display line, depress the , INITIATE CHART DEMO appears
in the upper display line and NO appears in the lower display line.
Step 2
Depress , select YES, depress . Instrument returns to Normal Display.
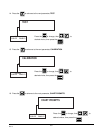
Step 3
Depress , CHANGE CHART appears in the upper display line, select YES, select YES again for
START NEW CHART.
Step 4
Chart demo begins.
Step 5
To exit or quit demo, depress to CHART ROTATION and select OFF.
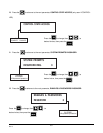
10.6 mA OUTPUT TEST
Allows the operator to verify that the current output(s) is/are functioning properly. A milliamp meter is required to
perform this test.
Step 1
With mA OUTPUT in the lower display line, depress the and INITIATE mA OUT TEST appears in the upper
display line and NO appears in the lower display line. Depress , select YES, then depress to start
the test.
Step 2
SELECT mA OUTPUT will appear in the upper display line and 1 2 3 4 will appear in the lower display line. To
select output to be tested, depress the key directly under the desired output number.
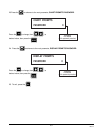
Step 3
Connect the milliamp meter across the output terminals being tested. Be sure to observe proper polarity when
connecting the meter, terminal 1 is positive. Use the to increase or decrease the current output in
1 mA steps, from 0 to 22 mA.