


Edition 3
Rev G
11-8
Section 11
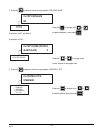
Step 2
Connect the milliamp meter across the corresponding output terminals observing proper polarity, terminal 1 is
positive.
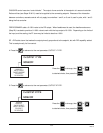
Step 3
Depress and INITIATE mA CAL appears in the upper display line and NO appears in the lower display
line. Depress select YES, then depress .
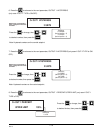
Step 4
The display should be flashing the message: USE UP/DN TO ADJUST OUTPUT TO 20 mA ENTER WHEN
DONE. Depress or and HIT UP/DN OR ENTER appears in the upper display line and
OUTPUT TO 20 mA appears in the lower display line.
Step 5
Use the as necessary to adjust the output to 20.00 on the milliamp meter. Depress to
enter the new value or to return to previous value. Depressing either ENTER or ESC exits the calibration.
11.6 SOLENOID CALIBRATION
CONSULT FACTORY.
This adjustment is made with an oscilloscope and a 10 ohm resistor. It should not have to be readjusted unless
the setting has been changed inadvertently.
11.7 CALIBRATION DEFAULTS
This routine will invoke a set of predetermined calibration values that are intended to emulate a "design center"
condition. In other words, the calibration values used would be the values derived for a unit whose critical compo-
nents would be equal to the nominal values. These default values should be used only:
1. When it is known that the current calibration values are inaccurate and not acceptable and quick
action is needed to restore the recorder to some basic level of operation.
2. To initially calibrate a brand new input board (never before calibrated) as a starting point in the
calibration process. This is the procedure initially used to test the boards on start-up at the factory.