3-13
MGP 464 • Operation
PRELIMINARY
Sync Polarity submenu
The display device may require a particular combination of horizontal (H) and
vertical (V) sync signal polarities. Rotate either the horizontal Adjust (
[
) or the
vertical Adjust ({) knob to select the sync polarity. The options are H-V-, H+V-,
H-V+, H+V+, or NA (appears when YUV Bi-lvl or YUV TriLvl is selected). The
default is H-V-.
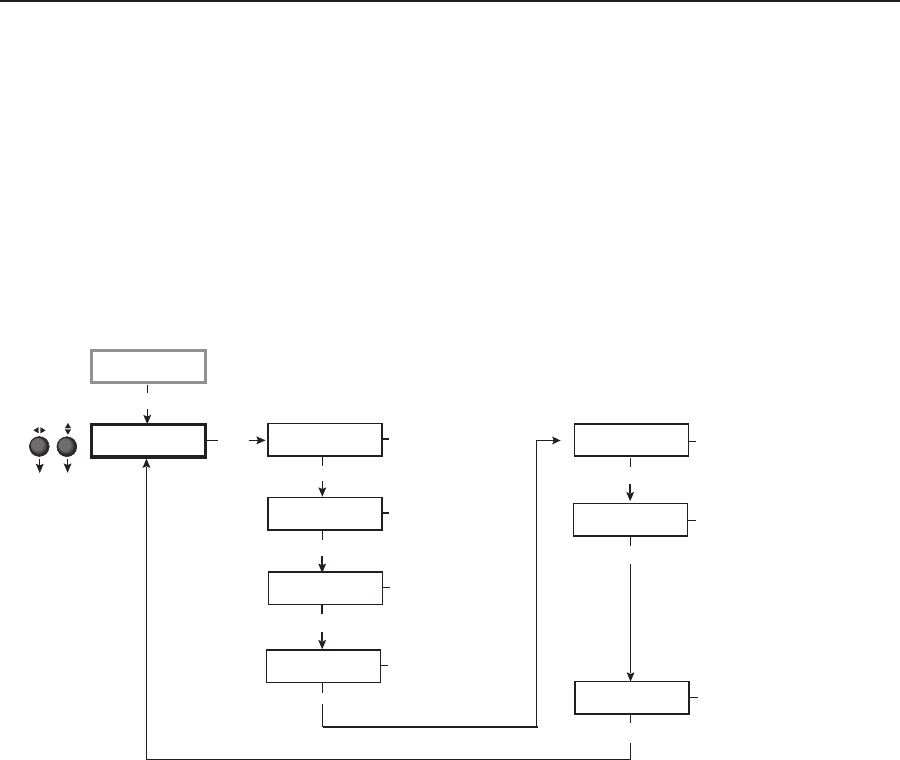
Window Conguration menu
The Window Conguration menu allows you to set window front/back priority,
add colored borders to the windows, select which window transition effect to
use when muting (closing) and unmuting (displaying) a window, and specify the
duration of the selected effect.
Output
Configuration
Window
Configuration
Menu
Window Priority
F <1> 2 3 4 B
Next
Window 1 Border
None
Next
Window Effect
Cut
Next
Next
Rotate either Adjust knob
to adjust the submenus.
Effect duration (in seconds)
0.0 to 5.0 seconds
in 0.1 second increments
Default: 0.5 seconds
Window priority
Default: 1 2 3 4
Window 1 border color
• Off • Magenta
• Red (default) • Cyan
• Green • Yellow
• Blue • Black
• White
Window switching effect
• Cut (Default) • Soft Wipe Curtain Out
• Dissolve • Hard Wipe Up
• Soft Wipe Up • Hard Wipe Down
• Soft Wipe Down • Hard Wipe Right
• Soft Wipe Right • Hard Wipe Left
• Soft Wipe Left • Hard Wipe Center In
• Soft Wipe Center In • Hard Wipe Center Out
• Soft Wipe Center Out • Hard Wipe Square In
• Soft Wipe Square In • Hard Wipe Square Out
• Soft Wipe Square Out • Hard Wipe Curtain In
• Soft Wipe Curtain In • Hard Wipe Curtain Out
Next
Effect Duration
0.5 second(s)
Next
Window 2 Border
None
Window 2 border color
• Off • Magenta
• Red • Cyan
• Green (default) • Yellow
• Blue • Black
• White
Window 3 Border
None
Window 3 border color
• Off • Magenta
• Red • Cyan
• Green • Yellow
• Blue (default) • Yellow
• White
Window 4 Border
None
Window 4 border color
• Off • Magenta (default)
• Red • Cyan
• Green • Yellow
• Blue • Black
• White
Next
Next
Window Configuration menu flow
N
The menus time out and return to the default cycle after 20 seconds of inactivity;
however, any selections you made with the Adjust knobs are saved and remain in
effect.
Window Priority submenu
The Window Priority submenu allows you to set how the windows will overlap
one another or “stack” on the display. For example, the window with priority 1 is
displayed in front of all the other windows. If the top priority window is sized to
fill the screen, the other windows are not visible.
By default, the Window Priority submenu displays the numbers of the four
windows in order, from left to right, with window 1 having first priority. To change
a window’s priority,
1
. Select a window by rotating the vertical Adjust ({) knob to move the angle
brackets on the LCD screen to the number of the window whose priority level
you want to change.
2
. Rotate the horizontal Adjust (
[
) knob to move the bracketed window
number to the desired priority position. For example, if you want window 3
to display in front of all the other windows (priority 1), move <3> all the way
to the left, following the letter F on the LCD screen.
3
. Repeat steps 1 and 2 as desired for each additional window whose priority
you want to change.


