


Reference
108
DTXTREME III Owner’s Manual
Reference
Drum Kit mode Song mode Click mode Tr igger mode File mode Utility mode Chain mode Sampling mode
Trigger Mode [TRIGGER]
This chapter explains the Trigger mode called up via the [TRIGGER] button.
In the Trigger mode, you can set the parameters related to the Trigger Signals received from the pads or Drum Triggers
(such as Yamaha DT20) which are connected to the Trigger Input jacks. These settings let you optimize the DTX-
TREME III for best operation and response to the Trigger Signals. If you are using drum triggers attached to acoustic
drums, or pads you’ve bought separately, you’ll need to adjust the sensitivity and assign Voices to the individual Trigger
Input Sources.
This mode also has settings that help prevent crosstalk* and double triggering*.
* Crosstalk
A triggering problem in which the vibration generated by hitting a certain pad may cause unwanted triggering in
another (usually adjacent) pad.
* Double triggering
A triggering problem in which two or more Trigger Signals may be generated simply by hitting a certain pad once.
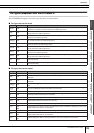
Basic Procedure in the Trigger Mode
1
Press the [TRIGGER] button to enter the
TRIGGER mode.
2
Note the tab menus (corresponding to the
[F1] – [F5] and [SF1] – [SF2] buttons) to
find the desired function, then press the
relevant button to call up the desired dis-
play.
3
Move the cursor to each parameter, then
set the value by using the data dial, or
[INC/YES] and [DEC/NO] buttons.
4
After setting, press the [ENTER/STORE]
button.
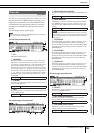
The following display will appear.
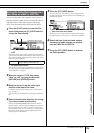
5
Select the destination Trigger setup num-
ber by using the data dial.
6
Press the [ENTER/STORE] button.
The following display prompts you for confirmation before
executing the store operation.
7
Press the [INC/YES] button to execute the
Store operation.
NOTE
• Creating an appropriate Trigger Setup is necessary to get optimum results and obtain the expected response and sound when
you hit the pads. One good way to ensure this is to find an exisiting Trigger Setup close to your favorite one, then edit it.
• Once you have found or created your favorite Trigger Setup, it is a good idea to assign the Trigger Setup number to the TriggerNo
parameter in the display called up via the [UTILUITY] → [F1] GENERAL → [SF4] STARTUP. In this way, you can have your favor-
ite Trigger Setup number automatically called up every time you turn the power on.
• Refer to page 26 for details about the [SF6] Input Lock.
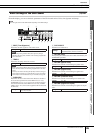
NOTE
• The Trigger Input jack, the level of the Trigger Signal and velocity are
shown at the top of the display when one of the [F1] – [F4] displays is
called up.
Destination Trigger setup number
• The edited Trigger Setup will be lost when selecting a different
Tr igger Setup or turning the power off. Make sure to store the Trig-
ger Setup data to internal memory by pressing the [ENTER/
STORE] button before selecting a different Trigger Setup or turn-
ing the power off.
•Never attempt to turn off the power while the message “Please
keep power on” is shown on the display; otherwise, all the settings
in the Trigger mode may be lost.
CAUTION
CAUTION