


Sampling Mode [SAMPLING]
Reference
DTXTREME III Owner’s Manual
137
Drum Kit mode
Reference
Song modeClick modeTr igger modeFile modeUtility modeChain modeSampling mode
4
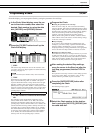
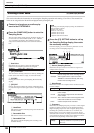
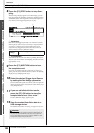
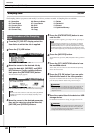
Press the [F1] SELECT button, then press
the [F6] REC button.
When the User Voice indicated on the [F1] SELECT display
contains no audio data, the Sampling Standby display
appears.
When the User Voice indicated on the [F1] SELECT display
contains the audio data, a confirmation message prompts you
whether or not to overwrite the already recorded User Voice.
If you do not want to overwrite the User Voice, press the
[DEC/NO] button, select a different User Voice having no
audio data, then press the [F6] REC button again.
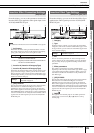
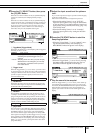
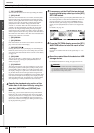
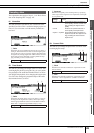
1 TrggrMode (Trigger Mode)
Determines the method by which Sampling will be triggered.
Normally, set this to “level.”
level Sampling starts as soon as an input signal
exceeding the specified Trigger Level
2 is
received.
manual Sampling starts soon after you press the [F6]
START button. This setting lets you manually
start Sampling, regardless of the input level
from audio source.
B Trigger Level
When the Trigger Mode 1 is set to “level,” you’ll also need
to set the Trigger Level. The level set here will be indicated as
a triangle in the level meter. For best results, set this as low as
possible to capture the entire signal, but not so low as to
record unwanted noise.
C RecMonitor
Determines the output level of the monitor for the input sig-
nal. This monitor signal is output from the PHONES jack or
the OUTPUT R and L/MONO jacks.
D RecGain
This parameter is available only when the Source is set to
“resample” and determines the recording gain when resam-
pling. The higher the value, the greater the volume of the res-
ampled sound. Before executing the Sampling (Recording)
operation, you can set the appropriate gain by checking the
volume via the Level Meter while hitting the pad.
E [F6] START
Press this button to start Sampling. When the Trigger mode 1
is set to “level,” pressing the [F6] START button calls up the
WAITING indication on the display, and actual Sampling
does not start until the proper level signal is received. When
audio signal exceeding the specified Trigger Level 2 is input
to the instrument, the RECORDING indication replaces the
WAITING indication and Sampling starts. When the Trigger
Mode 1 is set to “manual,” pressing this button starts Sam-
pling immediately.
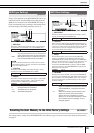
5
Adjust the input sound level for optimum
level.
Try to set the input level as high as possible without clipping
for the best sound quality.
Follow the instructions below to adjust the input level.
•When the Recording Source is set to “AUX IN,”
adjust the input signal level by using the GAIN knob
on the rear panel. If you cannot adjust the input level
appropriately, change the Mic/Line setting (page 128)
in the Utility mode.
•When the Recording Source is set to “resample,”
adjust the input signal level by setting the RecGain
parameter.
6
Press the [F6] START button to start the
Sampling operation.
•When the Trigger Mode 1 is set to “manual,” press-
ing the button immediately starts Sampling (a
RECORDING indication appears in the display).
•When the Trigger Mode 1 is set to “level,” pressing
the button enables Sampling but does not start it (a
WAITING indication appears in the display).
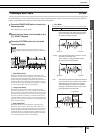
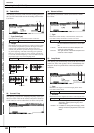
7
Play the sound to be sampled.
When the Trigger Mode 1 is set to “level” and an audio sig-
nal exceeding the specified Trigger Level 2 is input to the
instrument, the RECORDING indication replaces the WAIT-
ING indication and Sampling starts. During Sampling, a
graphic representation of the recorded audio appears in the
display.
Settings level, manual
Range 1 – 127
Range 0 – 127
Settings -12dB, -6dB, +0dB, +6dB, +12dB
1
5
3
4
2