


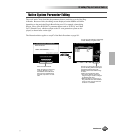


Song Creator
Song Creator
Reference 113
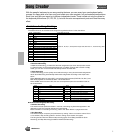
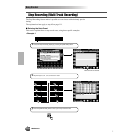
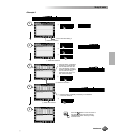
■ Punch In Trigger
• First Key On...... When FIRST KEY ON is selected, recording will begin when the first
key is played on the keyboard.
• Footswitch 1/2... When FOOT SW 1 or FOOT SW 2 is selected, recording will begin
when a footswitch connected to the corresponding rear-panel FOOT
SWITCH jack is pressed.
• Auto Set ............ When AUTO SET is selected, the punch-in and punch-out measures
are specified by the IN and OUT buttons (i.e., recording begins auto-
matically at the IN measure and ends at the OUT measure).
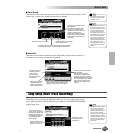
■ Part Selecting/Record Selecting
The default part for each track is displayed above the REC setting. The parts can be
changed as required by pressing the [PART SEL.] LCD button (the part names for
each track will be highlighted), selecting the desired parts via the corresponding but-
tons. When the parts have been changed, press the [REC SEL.] LCD button (the PART
SEL. LCD button will have changed to the [REC SEL.] LCD button) again to return to
the normal track setup display.
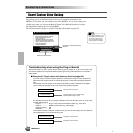
■ Delete
When the [DEL.] LCD button is pressed DELETE will appear for tracks which contain
data. Select DELETE via the corresponding LCD buttons while holding the [DEL.]
button to delete all data in the corresponding tracks. The data is actually deleted when
the [DEL.] LCD button is released.
■ Song Save/Delete
• Save................This function saves the edited song to the disk.
• Delete ............. This function deletes the specified song file from the disk.
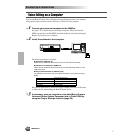
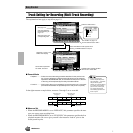
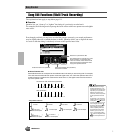
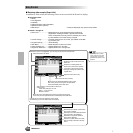
Track Setting for Recording (Quick Recording)
The explanations here apply to step #5 on page 111.
■ Delete
When the [DEL.] LCD button is pressed DELETE will appear for tracks which contain
data. Select “DELETE” via the corresponding LCD buttons while holding the [DEL.]
button to delete all data in the corresponding tracks. The data is actually deleted when
the [DEL.] LCD button is released.
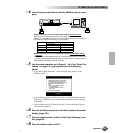
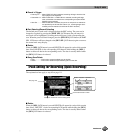
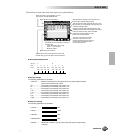
Set the desired track to “REC.”
Change the measure at which recording starts.
Play track
Muted track
No data
Record track
See page 125.
111