


Mixing Console
Mixing Console
146 Reference
Effect Type Settings
With the digital effects built into the 9000Pro you can add ambiance and depth to your
music in a variety of ways—such as adding reverb that makes you sound like you are
playing in a concert hall for a full, rich sound.
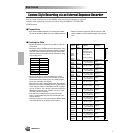
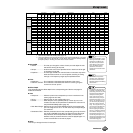
■ Effect Block
The 9000Pro has 9 independent digital signal processing (DSP) blocks for effects, plus
the Vocal Harmony processor. Each DSP block applies to a specific part or portion of
the 9000Pro sound, as listed below. The DSP block numbers appear in several locations
on the 9000Pro panel and in some of the display screen for easy reference: e.g.,
REVERB (1), CHORUS (2), DSP (3), DSP (4), etc.
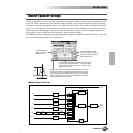
■ About the Effect Connections – System and Insertion
All the effect blocks are connected or routed in one of two ways: System or Insertion.
System applies the selected effect to all parts, while Insertion applies the selected effect
to one specific part. Reverb (1) and Chorus (2) are System effects, and DSP (4) - Vocal
Harmony (9) are Insertion effects. The DSP (3) effect, on the other hand, can be config-
ured for either System or Insertion routing. (This is done from the parameters of the
individual effect type; see above.)
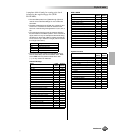
Parts to be applied Description
Reverb (1) Overall Creates a reverb effect that makes you sound like you
are playing in places like a concert hall, or live in a club.
Chorus (2) Overall Adds a chorus effect that makes your playing sound as
though multiple parts were being played together at the
same time.
DSP (3) Auto Accompaniment/
Song
In addition to the Reverb and Chorus types, the 9000Pro
has special DSP effects, that include additional effects
usually used for a specific part, such as distortion and
tremolo.
DSP (4) VOICE RIGHT1 This block (which can be turned on or off by a panel but-
ton) is applied to the RIGHT1 voice.
DSP (5) VOICE RIGHT2 This block (which can be turned on or off by a panel but-
ton) is applied to the RIGHT2 voice.
DSP (6) VOICE RIGHT3 This block (which can be turned on or off by a panel but-
ton) is applied to the RIGHT3 voice.
DSP (7) VOICE LEFT This block (which can be turned on or off by a panel but-
ton) is applied to the LEFT voice.
DSP (8) Microphone Sound This block (which can be turned on or off by a panel but-
ton) is applied to the microphone sound.
Vocal Harmony (9) Vocal Harmony This block (which can be turned on or off by a panel but-
ton) is used for the Vocal Harmony effect. See page 81.
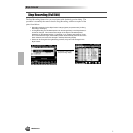
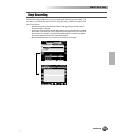
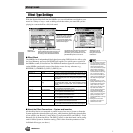
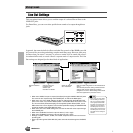
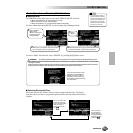
Select this to call up the dis-
play for parameter settings.
Note that the contents of
the Parameter display may
be different according to the
selected Effect Type.
Select the
desired block.
Assigns a specific effect to the currently
selected Effect Block. Note that the con-
tents of the Type List may be different
according to the selected Effect Block.
Select this to store
your settings by fol-
lowing the on-screen
instructions.
Use these two LCD buttons to select the
desired parameter group. The lower
parameter group is available when the
[SLOW/FAST] button is turned on.
• You may find that, when chang-
ing a drum sound of an auto
accompaniment style and then
restoring the original drum
sound, the actual sound (espe-
cially the effect processing —
Reverb, Chorus, and DSP 3)
sounds different than the origi-
nal. To restore the original
drum sound and its effect pro-
cessing, select a different style,
then select the original style
once again.
• Some effect types (e.g., Tem-
poDelay, VDstH+TDly, etc.) are
synchronized with the current
tempo. When any of these
effect types is selected, noise
may result when simulta-
neously playing the keyboard
and pressing the [SLOW/
FAST] button or changing the
tempo. To avoid this, first stop
playing the keyboard, then
press [SLOW/FAST] or change
the tempo.
• Editing some of the effect
parameters may produce a
small amount of noise.
144