


Installing Optional Hardware
Installing Optional Hardware
Reference 181
Optional Plug-in Board Installation
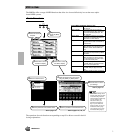
A variety of optional Plug-in boards sold separately let you expand the voice library of
your instrument. The following types of Plug-in boards can be used with your instrument.
• PLG150-AN • PLG150-PF
• PLG100-VL • PLG150-VL
• PLG100-DX • PLG150-DX
• PLG100-XG
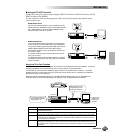
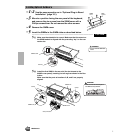
1 Turn the 9000Pro power off, and disconnect the AC power
cord. Also, if the keyboard is connected with other external
device(s), disconnect the device(s).
2 Turn the 9000Pro face down on a blanket or some soft sur-
face, giving you direct access to the bottom of the instru-
ment.
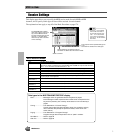
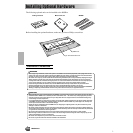
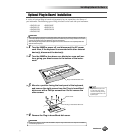
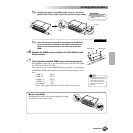
3 Move to a position facing the front panel of the keyboard,
and remove the eight screws from the Plug-in board/Hard
disk cover with a Phillips screwdriver. Do not remove the
other screws.
4 Remove the Plug-in board/Hard disk cover.
CAUTION
• When inserting Plug-in boards and connecting cables, make sure that you check that they are inserted and
connected properly. Improperly inserted Plug-in boards and cables may cause faulty contacts and an electri-
cal short circuit which may cause damage or result in a malfunction.
• After mounting the Plug-in board, be sure to tighten the screws as directed so it is completely stable and
does not move in any way.
Plug-in board/Hard disk cover
Black screws
Plug-in board/Hard disk cover
• Keep the removed (8) screws
in a safe place. They will be
used when attaching the Plug-
in board/Hard disk cover to the
keyboard again.
WARNING
• In order not to drop any screws inside the 9000Pro, keep the Plug-in Board and cover away from the 9000Pro
in the following steps #5 - #7.
179