


Chapter 6: Modulation and Envelopes
142 ANDROMEDA A6 REFERENCE MANUAL
TRIG and RETRIG Pages Parameters
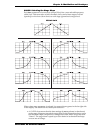
The envelope’s Time and Level parameters determine its shape or contour. As
important as an envelope’s shape is when it begins its cycle and how it plays
through the cycle. This is where the
TRIG and RETRIG pages come in.
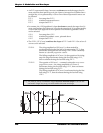
An envelope starts its cycle when it receives a trigger. The most typical and often-
used trigger source is the keyboard: a key or keys played on the keyboard instruct
the envelopes to start their cycles. By the same token, incoming MIDI notes are also
used to trigger the envelopes, the A6’s Sequencer and Arpeggiator, and a slew of
other trig sources we’ll get into shortly.
The
TRIG and RETRIG pages let you determine:
• where the trigger comes from – the keyboard/MIDI, another envelope, an
LFO, the Sequencer and so forth
• under what conditions an envelope responds to a received trigger
• how an envelope proceeds through its cycle once a trigger is received
• if an envelope is re-triggered and how responds
So this page not only lets you determine if and when an envelope gets a trigger but
also what is does after the trigger starts the envelope. Looping would normally fall
into this category but because it has a rather large set of parameters,
LOOP has its
own page of parameters described on page 160.
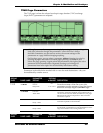
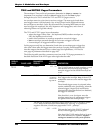
The following table provides a summary overview of the
TRIG page parameters. A
detailed discussion of the
MODE types starts right after the table.
DISPLAY
PAGE PANEL LABEL
PARAMETER
DISPLAY
OPTIONS
or RANGE DESCRIPTION
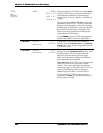
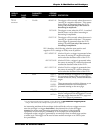
TRIG
TRIGGER ENABLE OFF, ON
The TRIGGER button on each envelope, or soft
knob
6 under each envelope page display,
turns the trigger for the selected envelope on
or off.
—
SOURCE
Any of the A6’s 71
modulation
sources. See
Appendix B.
This parameter allows you to select an “input”
that triggers the envelope. Any of the A6’s 71
modulation sources can be used to trigger the
envelope.
The selected trigger source is activated when
certain conditions exist. Specifically, when the
selected trigger’s Input Level and Polarity
characteristics (described below) are detected,
the trigger is activated.
Note that this is a one shot input: once the
envelope starts its cycle, subsequent triggers
are ignored until the envelope stops.
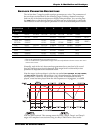
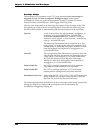
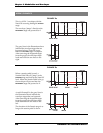
The A6 gets its signal to generate a trigger when the SOURCE reaches a certain
LEVEL that you set (next) and when the source “moving” in a positive or
negative direction, or both (next page under
POLAR - polarity).
—
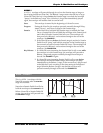
LEVEL
-100 ··· +100
This sets the level of the SOURCE (selected
above) where triggering will take place.
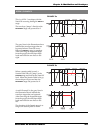
Note that if the
POLAR setting (below) is set to
one of the absolute (
ABS) options, negative
settings are treated as is they were positive.