


Chapter 1: Getting Started
22 ANDROMEDA A6 REFERENCE MANUAL
AUDIO CONNECTIONS
After you’ve set up the A6 and plugged it into an AC outlet, connect your A6 to a
sound system. Since the A6 does not contain an amplifier or speakers, you’ll need to
connect it to some kind of a sound system in order to hear it. An amp with a full-
range speaker will also suffice, as will a stereo music system with external audio
inputs. You can also use a pair of standard stereo headphones with a 1/4” TRS plug
inserted into the back panel.
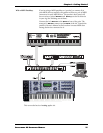
For stereo, connect two 1/4” 2-conductor (unbalanced) audio cables from the unit’s
LEFT and RIGHT jacks on the rear panel to two inputs on your sound system. For a
monophonic output, use an audio cable from the A6’s
LEFT jack. The four AUX OUT
jacks plus the eight stereo VOICE OUTPUTS will be covered in Chapter 4.
For use with stereo headphones, the A6 sports a 1/4” stereo
HEADPHONE jack on the
rear panel.
In any case, turn your A6 on first, then your sound system or amplifier. Use the
MASTER VOLUME control located near the front panel’s upper left-hand corner to set
the overall output level of the synthesizer.
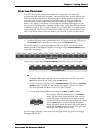
PEDALS AND FOOTSWITCHES
Momentary, 2-conductor foot switches are used for the SWITCH and SUSTAIN inputs
on the A6’s back panel. “Momentary” means that it is a spring-loaded switch that
operates by “pressing and releasing” for
ON (press) or OFF (release) signals.
A potentiometer, 2-conductor foot pedal is used for the
PEDAL/CV back panel input.
This input is typically used for volume or modulation (typically vibrato, but you can
use it for other types of modulation). “Potentiometer” means that the pedal
mechanically operates an internal knob giving you “more” or “less” rather than
ON
or OFF like a switch. These pedals are often referred to as “rocker pedals”.