


Appendix C: Troubleshooting
ANDROMEDA A6 REFERENCE MANUAL266
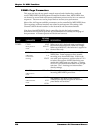
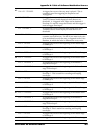
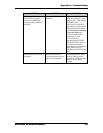
AUTO TUNE Parameters
PAGE PARAMETER
OPTIONS
or RANGE
DESCRIPTION
TUNE
MASTER
354.35 Hz ···
546.42 Hz
Sets the basic tuning reference of the
Andromeda for A4 (the A above middle C).
The default is 440.00 Hz, which is the modern
concert reference. You can set it to A=440 by
pressing the
INC/DEC keys simultaneously.
BKTUNE
ON/OFF
When ON, the Andromeda will constantly tune
unused oscillators in the background.
TMPTUN ON/OFF
When ON, the Andromeda will constantly
monitor its temperature and adjust the
oscillators to compensate for changes.
VOICE 1-16
Selects which of the A6's sixteen voices is
currently shown in the TUNE display.
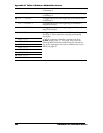
AUTO
BAND 1-16
Selects which oscillator tuning band is shown in
the top line of the display.
VCACAL
Press twice to initiate a calibration of each VCA's base levels.
OSCFRQ
Press twice to tune the oscillators only.
OSC-PW
Press twice to tune the pulse width of the oscillators only.
FILFRQ
Press twice to tune the filter frequencies only.
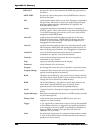
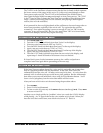
HOW TO USE THE TUNE DISPLAY
Pressing the AUTO TUNE button will take you to the AUTO page. This displays a
summary of the A6’s tune status. The top row shows the voice number. The middle
row shows the tune status of each voice’s VCAs. The bottom row shows the tune
status of the filters and oscillators. A “
T“ under the voice means it was tuned
properly. A blank space means the voice was not tuned since the last powerup.
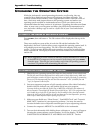
In the other Auto Tune pages except
TUNE page, the display gives more tuning
details. Usually, this will be of no concern, but in case there's some problem, you can
track it down using this display. There are a lot of things to tune in an analog
synthesizer. Each of the Andromeda's 16 voices has two oscillators which need to be
tuned over 17 different frequency bands. In addition, the pulsewidth, filter
frequencies, and the VCAs need to be calibrated.
With so many different variables, there's not room to monitor them on a single
screen. So, you need to scroll through the displays using the
VOICE and BAND
controls to see them all. Here's an example of what a screen may look like:
1: TUNEOK TUNEOK TUNEOK -OSC1- TUNEOK TUNEOK
2: TUNEOK TUNEOK TUNEOK NOTUNE TUNEOK TUNEOK
3: TUNEOK TUNEOK TUNEOK TUNEOK
4: TUNEOK TUNEOK TUNEOK TUNEOK
5: TUNEOK TUNEOK TUNEOK TOOHI
6: TUNEOK TUNEOK
OSC1 OSC2 VCA OSC-PW FILT1 FILT2 12 1
VOICE BAND