


Chapter 10: Using Effects
208 ANDROMEDA A6 REFERENCE MANUAL
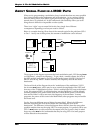
TUTORIAL: HOW TO EDIT A REVERB
The best way to learn a new piece of gear is to start using it in your studio. This
section is designed to teach you how to edit your own effects using normal day-to-
day examples. Remember that programs are subjective and these are just guidelines.
If the program sounds weird when you’re all done, change it - that’s what the soft
knobs are for!
You can use the following section to edit any Program or Mix in the Andromeda.
But to get started, use a basic bass or pad patch that doesn’t have many effects to
begin with. Whatever its effect type is, we’re going to change it to a simple reverb.
This will be a typical large, warm hall program, with a lot of space to swim around.
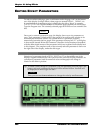
SET THE TYPE AND AUDIO LEVELS
1. If it’s not on already, press the EFFECTS ON/OFF switch to turn the LED on.
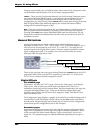
2. Enter Digital Effects Edit mode by pressing the
DIGITAL EFFECTS CONFIG button on
the top panel. The
CONFIG page will be displayed.
3. Turn soft knob
8 (the TYPE parameter) fully counter-clockwise to select LG HALL
(Large Hall).
4. Increase the
SEND level to about 80 using soft knob 1, and the OUT level to 80
using soft knob 7.
At this point, you will probably be able to hear reverb when you play the keyboard.
5. Press soft button
2 (PARAM1).
You’ll now see six different parameters in the display.
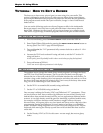
SET THE REVERB’S DECAY AND TONE
The quickest way to change the sound of any reverb program is to change the Decay
and LPF (Low Pass Filter) parameters. The Decay time (soft knob
1 on this page)
dictates the size of the room, and the LPF (soft knob
4) emulates the wall surfaces. To
simulate a large castle chamber with a few tapestries and other soft surfaces, we’ll set
the decay fairly long and the LPF relatively low. Don’t worry if the decay time seems
long, we can do other things to trim it down later.
6. Set the
DECAY to around 4.638 (seconds) using soft knob 1.
7. Set the
LPF to 5.650 (kHz) using soft knob 4.
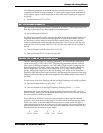
Our next step is editing the Density (
DENS) and Diffusion (DIFF) parameters. These
are less obvious to hear, but can make a big difference on your sound. Density (soft
knob
5) affects how smooth the attack will be, and can approximate different surface
textures. A very high density would be good for simulating a polished marble room,
for example, and lower densities would simulate a rougher surface with more
discrete echoes. A Program with a very fast Attack and Decay can be a big help when
programming Density and Diffusion; it’s much easier to hear than on a sustained
sound—but don’t change Programs now or you’ll lose your changes so far! Play the
keyboard while moving the Density up and down with soft knob
5 to hear its effect
on the hall.
8. Set the Density (
DENS) to 74% for this room - not too rough, but not too glassy
either.