


21
MR16 Owner’s Manual (Names and functions)
<Note>:
If you do not use the MR16 for a
long time, we recommend unplugging the
power cord from the AC outlet.
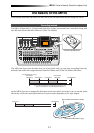
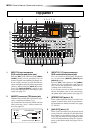
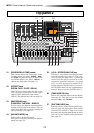
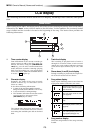
13. [REC SELECT] keys
20. [TRIM] controls
Each control adjusts the input gain of the
corresponding input channel (see page 16,
and 37 through 42).
19. [DISTORTION] control
Controls the amount of the distortion effect
for a guitar connected to the [XLR] connec-
tor or [UNBAL/GUITAR] jack (phone type) on
the [INPUT A] channel.
This control is effective only when the [IN-
PUT A SELECT] switch is set to "GTR/DIST"
(see pages 35 and 68).
18. [PEAK] indicators
Each indicator lights when the input signal
is overloaded (see page 16). You should ad-
just the input gain using the [TRIM] control
so that the [PEAK] indicator does not light.
17. [TO STEREO BUSS] keys
[TO STEREO BUSS LEVEL] control
Each of the [TO STEREO BUSS] key selects
whether or not sending the corresponding
input signal to the stereo L/R busses (see
page 85). Each press of the key alternates
ON and OFF. When ON, the key illuminates
in green. When OFF, it is unlit. When the
corresponding input is assigned to a record-
ing track, the key flashes in green.
A long press of the key enters the input menu
of the MENU mode, in which you can set
phantom power on/off, panning, etc. (see
pages 86 and 144).
The [TO STEREO BUSS LEVEL] control adjusts
the level of the signal sent to the stereo L/R
buss.
14. [PAN] controls
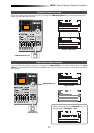
Control panning for tracks 1 through 8.
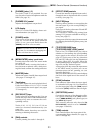
Used to select the recording track(s). You can
record onto up to four tracks simultaneously.
Pressing a key arms or unarms the corre-
sponding track(s).
Tracks 9/10, 11/12, 13/14 or 15/16 are
armed or unarmed simultaneously (see
pages 36).
In the menu mode, these keys are used for
entering or deleting characters .
Each fader adjusts the track playback level.
Each of track faders 9/10, 11/12, 13/14 and
15/16 controls the stereo signal (see pages
37 through 45).
12. Track faders
Adjusts the stereo (L and R) buss output level
(see pages 37 through 45).
11. [MASTER] fader
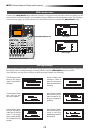
Turn on or off the power of the unit (see
page 30). To turn off the power when the
power is on, press and hold down the
[POWER] switch for a few seconds.
9. [POWER] switch
Adjusts the headphone output level.
7. [PHONES VOL] control
Two jacks (1 and 2) are provided. You can
use two pairs of stereo headphones with the
MR16 (see page 31).
6. [PHONES] jacks (1, 2)
8. LCD display
This 132 x 64 dot LCD display shows vari-
ous information (see page 26).
10. [MENU/ENTER] rotary / push knob
Pressing this knob enters the menu mode
(see page 28).
In the menu mode, rotating this knob se-
lects the item or numeric value, while press-
ing this knob confirm the setting/selection.
16. [INPUT EQ] keys
Each key selects whether or not applying the
internal input EQ to the corresponding in-
put signal.
Each press of the key alternates ON and OFF
of the EQ (see page 66).
You can select a desired EQ setting from
among 33 EQ presets available in the EQ li-
brary (see page 67).
A long press of the key enters the menu mode
for selecting the desired EQ library entry (see
page 66).
15. [EFFECT SEND] controls
Control the amount of signals from tracks 1
through 8 sent to the internal effect (reverb
or delay) (see page 72).