Arpeggiator settings
102
Other examples of creating a user
arpeggio pattern
Melody pattern
1. Set “Step (Step No.)” to 01, and press the center
of the ClickPoint.
2. Select Tone 0, and press the center of the
ClickPoint.
3. Use the ClickPoint [®] to change “Step” to 02,
and enter Tone 0.
4. In the same way, change “Step” to 03 and enter
Tone 0.
5. Set “Step” to 04 and enter Tone 0.
6. Set “Step” to 05 and enter Tone 0.
7. Set “Step” to 07 and enter Tone 0. (We won’t
enter a tone in “Step” 06.)
8. Set “Step” to 08 and enter Tone 0.
9. Press the [MENU/OK] button.
10.Use the [VALUE] dial to change “Step (Step
No.)” to the appropriate step. Use the
ClickPoint to select “Ptch (Pitch Offset)” and
make the following settings.
Set the Step 01 “Ptch (Pitch Offset)” to +00.
Set the Step 02 “Ptch (Pitch Offset)” to +10.
Set the Step 03 “Ptch (Pitch Offset)” to +00.
Set the Step 04 “Ptch (Pitch Offset)” to +00.
Set the Step 05 “Ptch (Pitch Offset)” to +12.
Set the Step 07 “Ptch (Pitch Offset)” to +00.
Set the Step 08 “Ptch (Pitch Offset)” to –02.
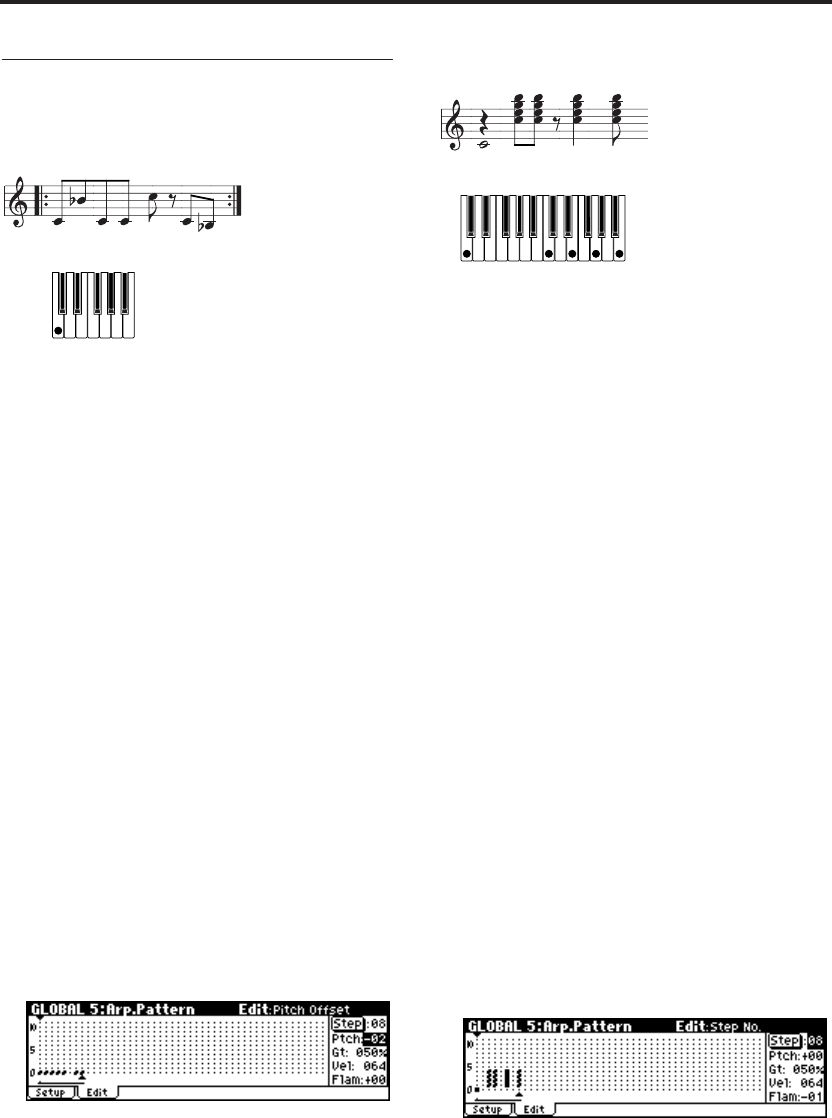
Chordal pattern
1. Set “Step (Step No.)” to 01, and press the center
of the ClickPoint.
2. Select Tone 0, and press the center of the
ClickPoint.
3. Use the ClickPoint [®] to change “Step” to 03,
and enter Tones 1, 2, 3, and 4. (We won’t enter a
tone in Step 02.)
4. In the same way, change “Step” to 04, and enter
Tones 1, 2, 3, and 4.
5. Change “Step” to 06, and enter Tones 1, 2, 3,
and 4. (We won’t enter a tone in Step 05.)
6. “Step” to 08, and enter Tones 1, 2, 3, and 4. (We
won’t enter a tone in Step 07.)
7. Press the [MENU/OK] button.
8. Use the [VALUE] dial to change “Step (Step
No.)” to 01. Use the ClickPoint to select “Gt
(Gate)” and change it to LGT.
9. Use the [VALUE] dial to change “Step (Step
No.) to 06. Use the ClickPoint to select “Gt
(Gate)” and change it to LGT.
Note: To simulate the timing nuances of a
strummed guitar chord, select “Flam.” In
Program mode, select an acoustic guitar
program, and choose the user arpeggio pattern
that you created here. In the Setup page of
PROG 7: Ed–Arp/Ctrls, Setup, set “Gate” to
Step.
Then return to the GLOBAL 5: Arp.Pattern,
Edit page. For odd-numbered steps, set “Flam”
to a positive (+) value. For even-numbered
steps, set “Flam” to a negative (–) value.
Drum pattern
You can use the arpeggiator to play a rhythm pat-
tern by using “Fixed Note” with a drum program.
1. Select a drum kit program.
For this example, select preset program B020:
Standard Kit 1.


